In engineering (and design), geometric constraints refer to limitations on a single entity ![]() (size, location)
and dependencies on pairs of entities
(size, location)
and dependencies on pairs of entities ![]() ↔
↔![]() (distance, arc angle). Our laundry room was a
great exercise in satisfying geometric constraints!
(distance, arc angle). Our laundry room was a
great exercise in satisfying geometric constraints!
The Constraints
-
Door frame

- unmovable, 32” wide opening
-
Premade cabinet


- 24x24x90” (in a 93” tall room)
- 2” buffer from wall for recessed outlet
-
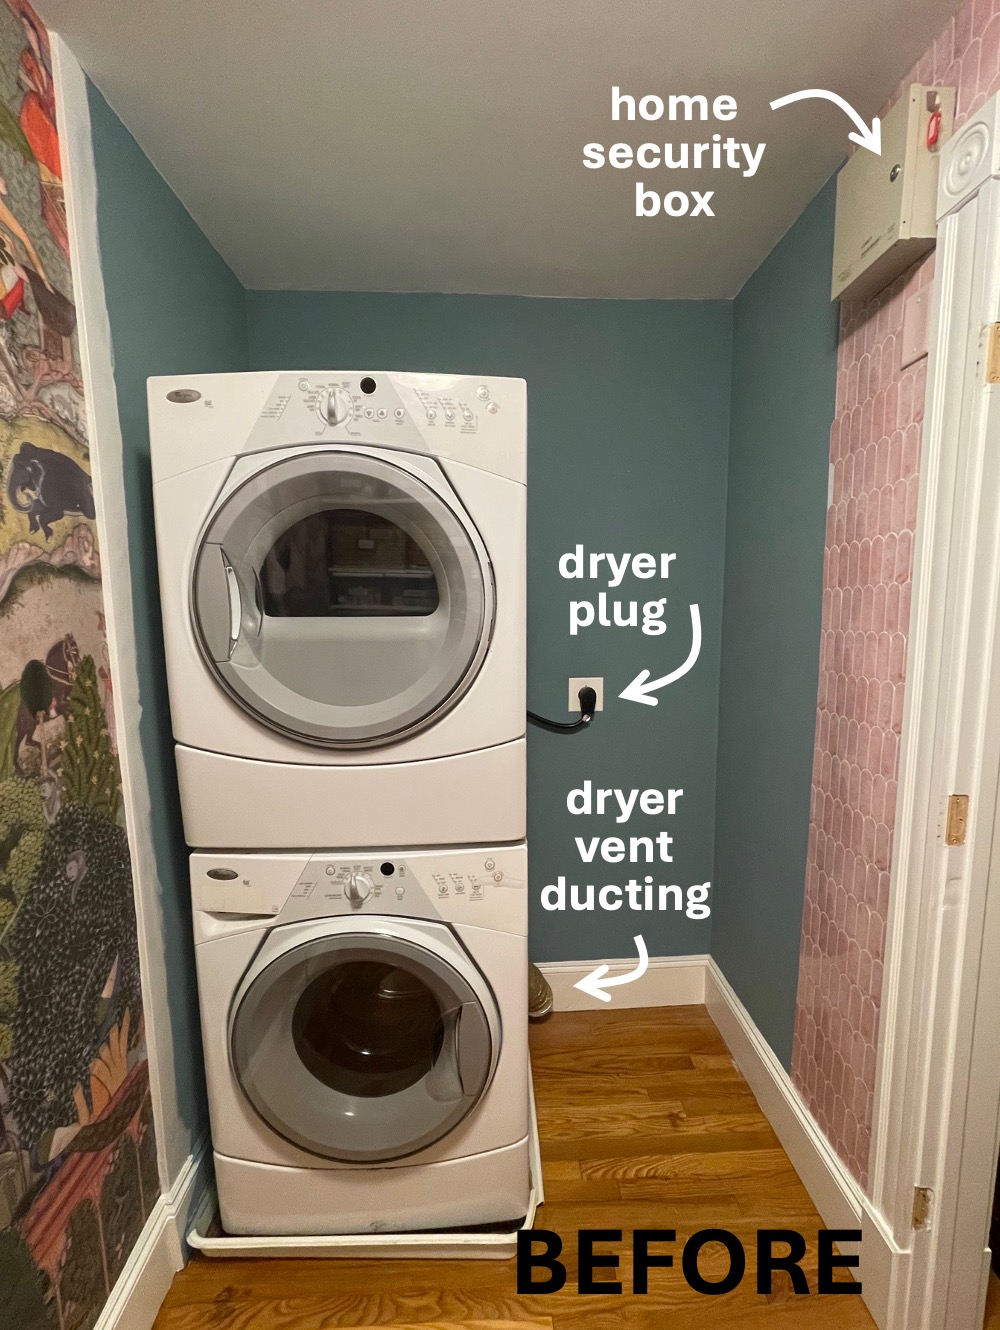
Stacked washer/dryer


- overflow drain pipe is in the floor
- dryer ducting overlaps cabinet
-
Storage
- accessible laundry supplies
- space for bulky bedding
The Process
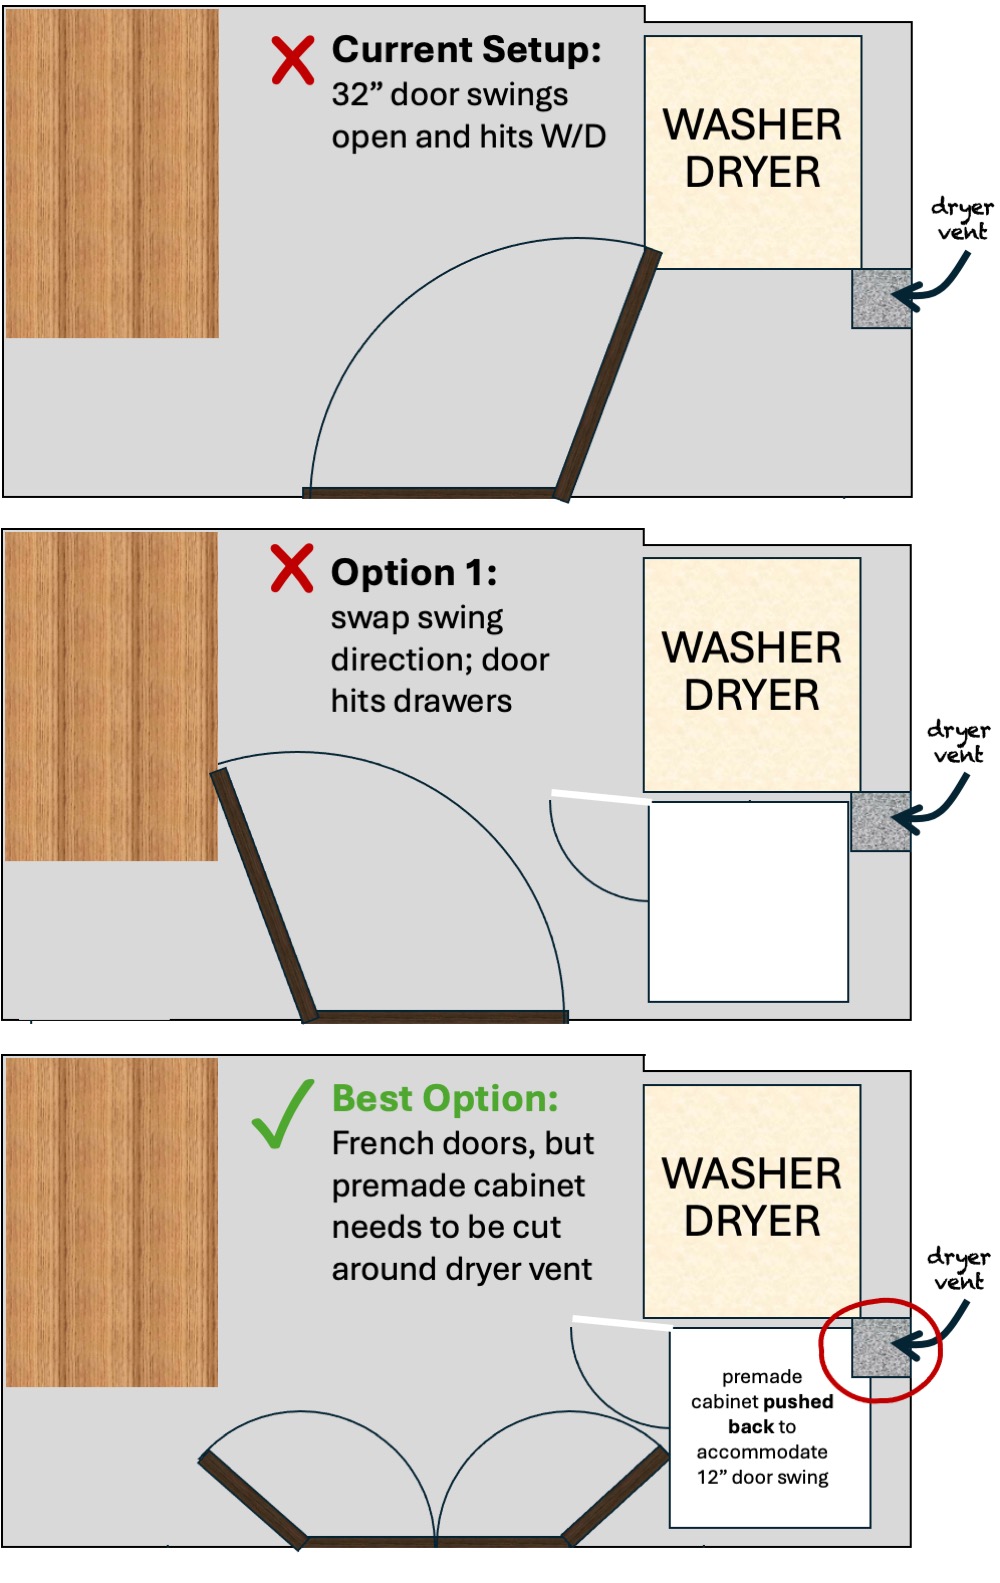
Step 1: French Doors
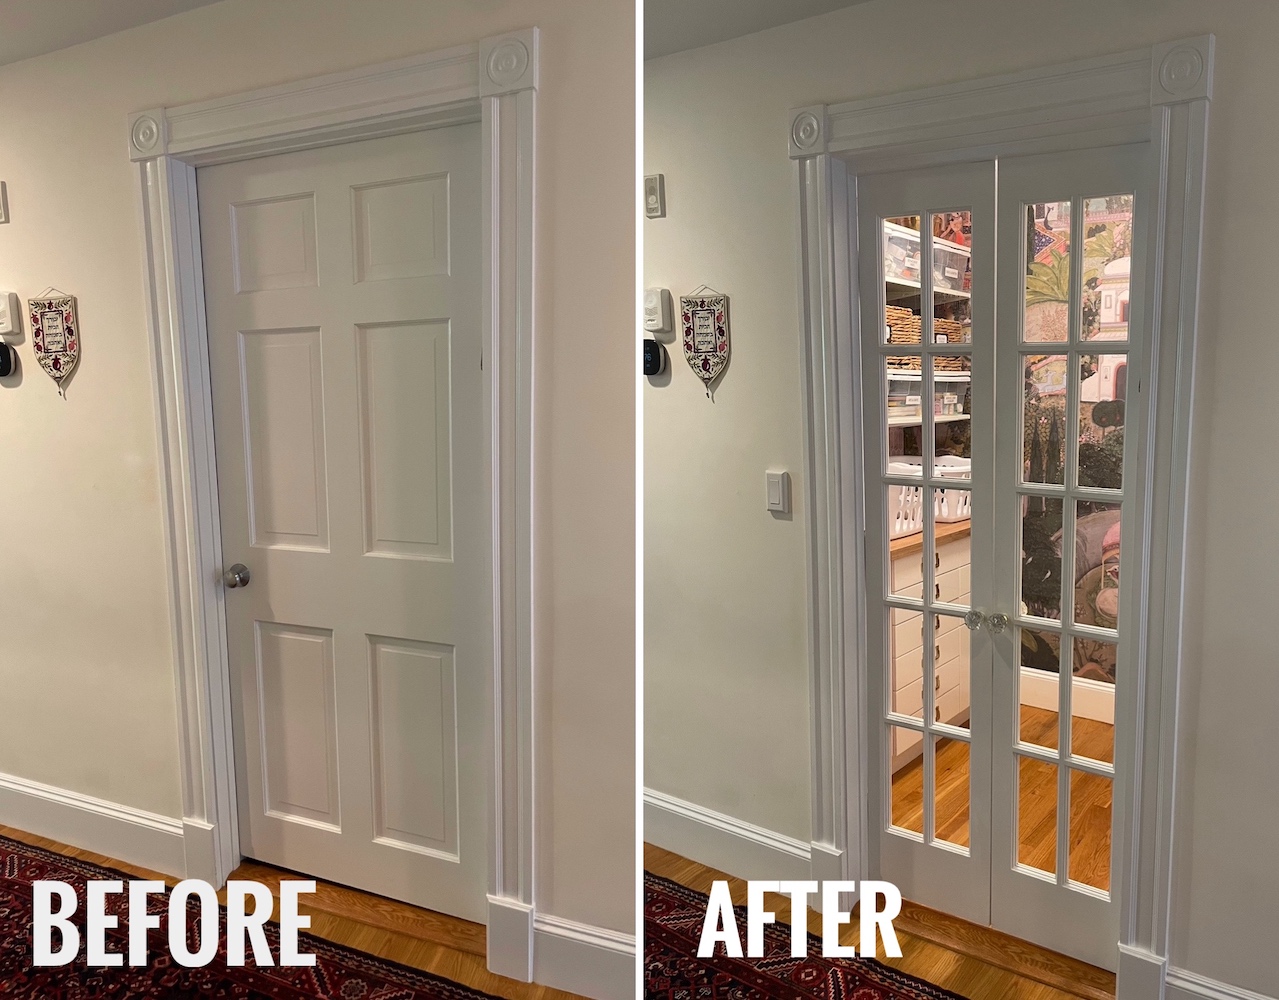
The narrowest manufactured French doors are 48” wide, so I installed 32” wide bifold window doors instead. The two 16” door slabs swing open with 3.5” hinges and stay shut with ball catch hardware.
| Challenge | Solution |
|---|---|
|
|
|
|
|
|
|
|
|
|
|
|
Step 2: Premade Ikea Pantry Cabinet
I used a premade 24x24x90” Ikea Sektion cabinet because of the flexibility for shelves and cabinet doors.
| Challenge | Solution |
|---|---|
|
|
|
|
|
|
|
|
|
|
|
|
|
|
|
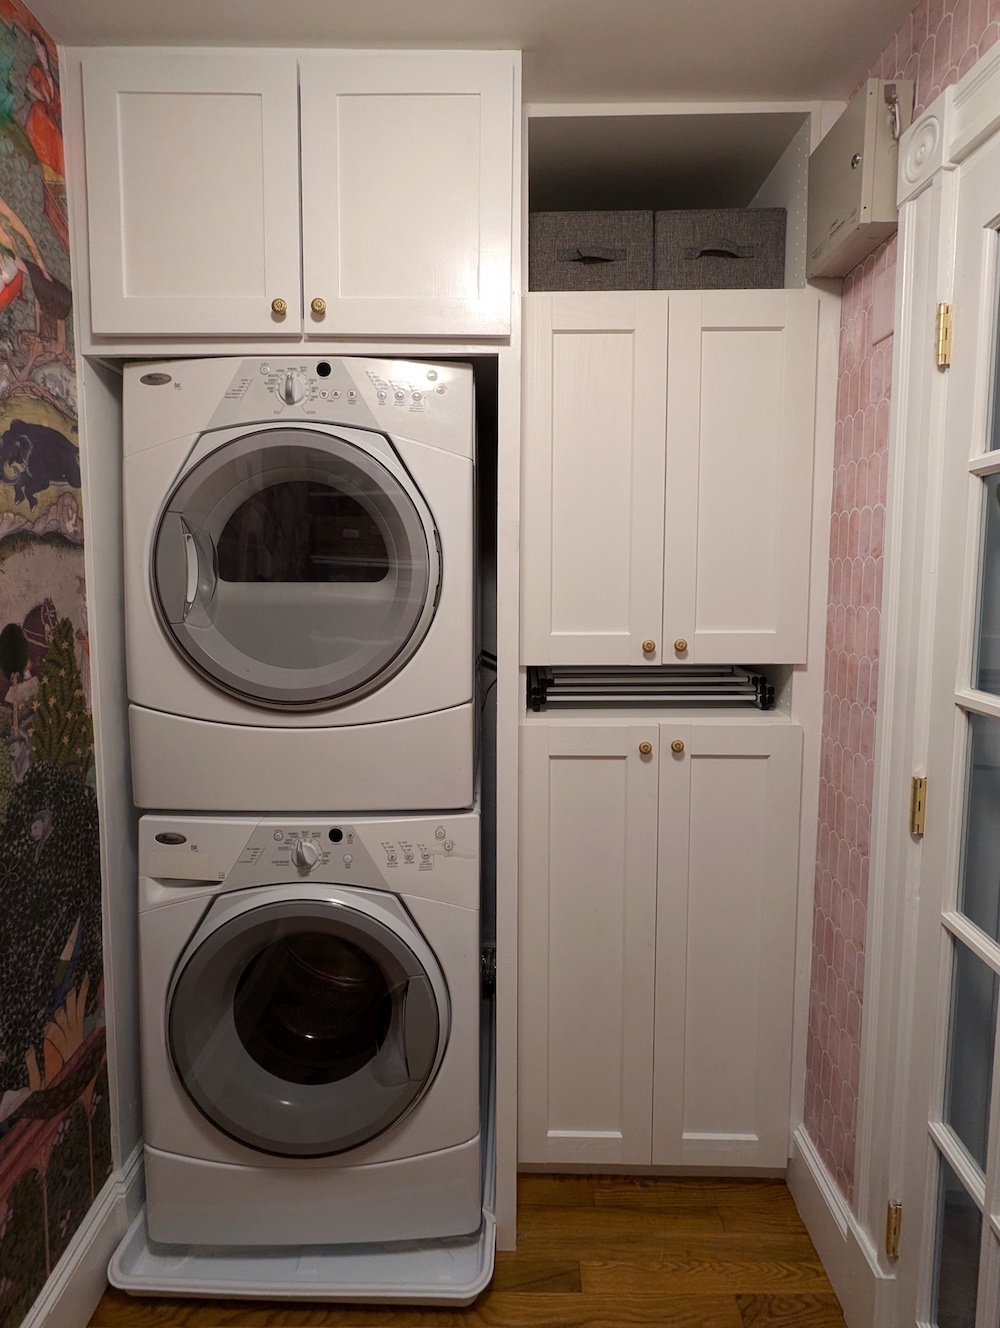
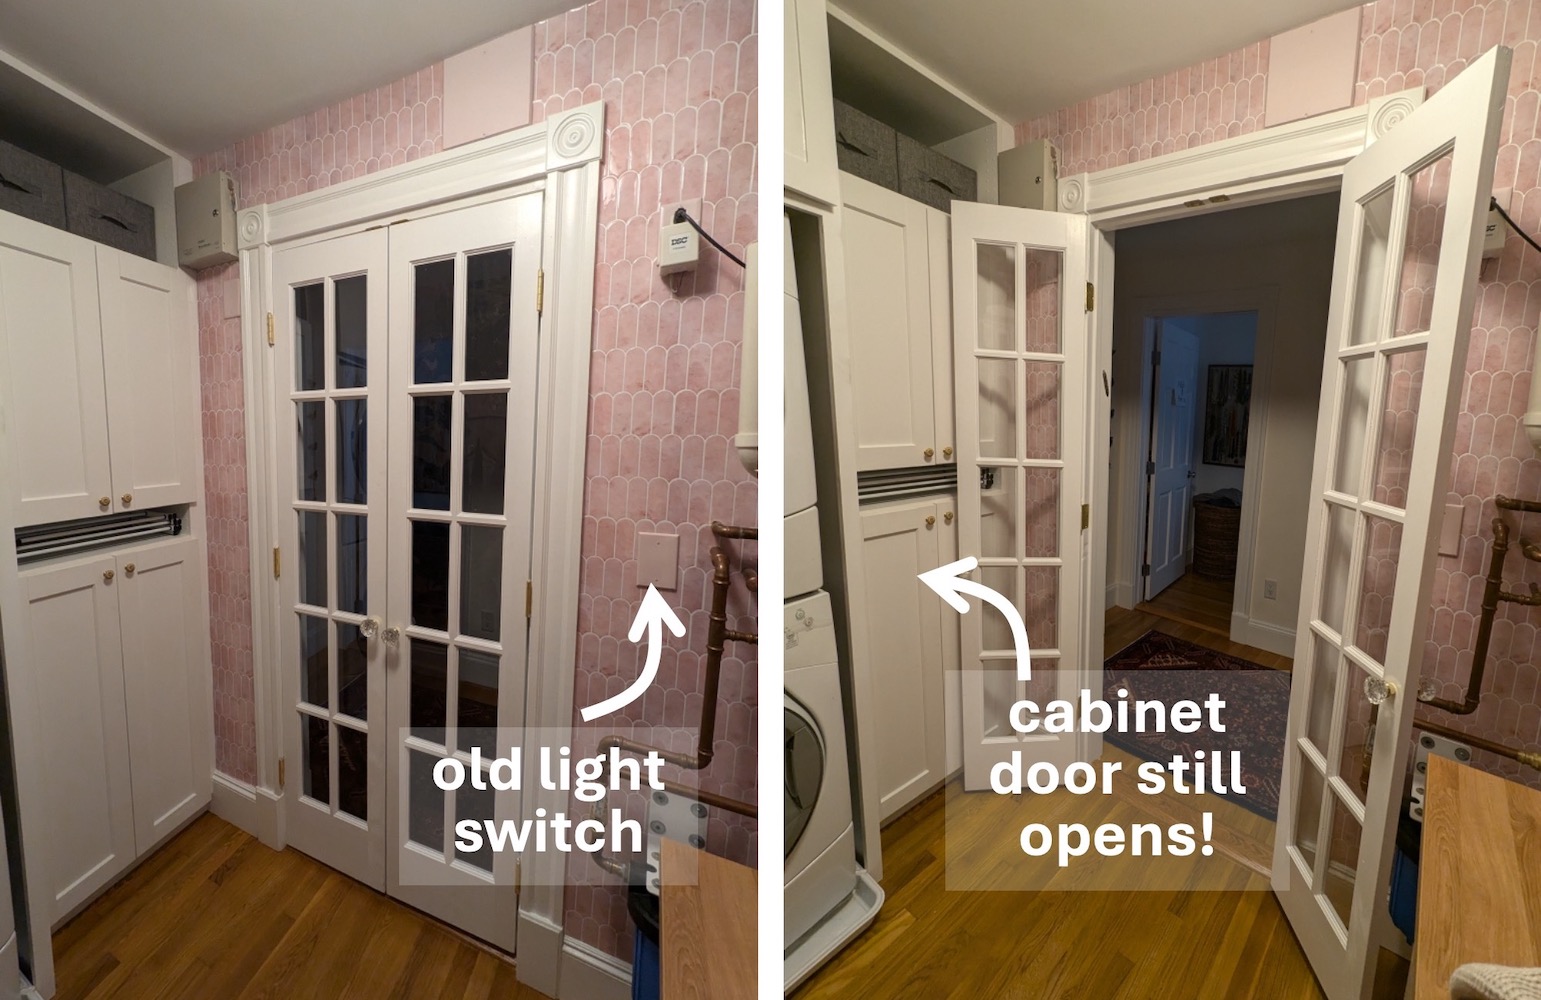
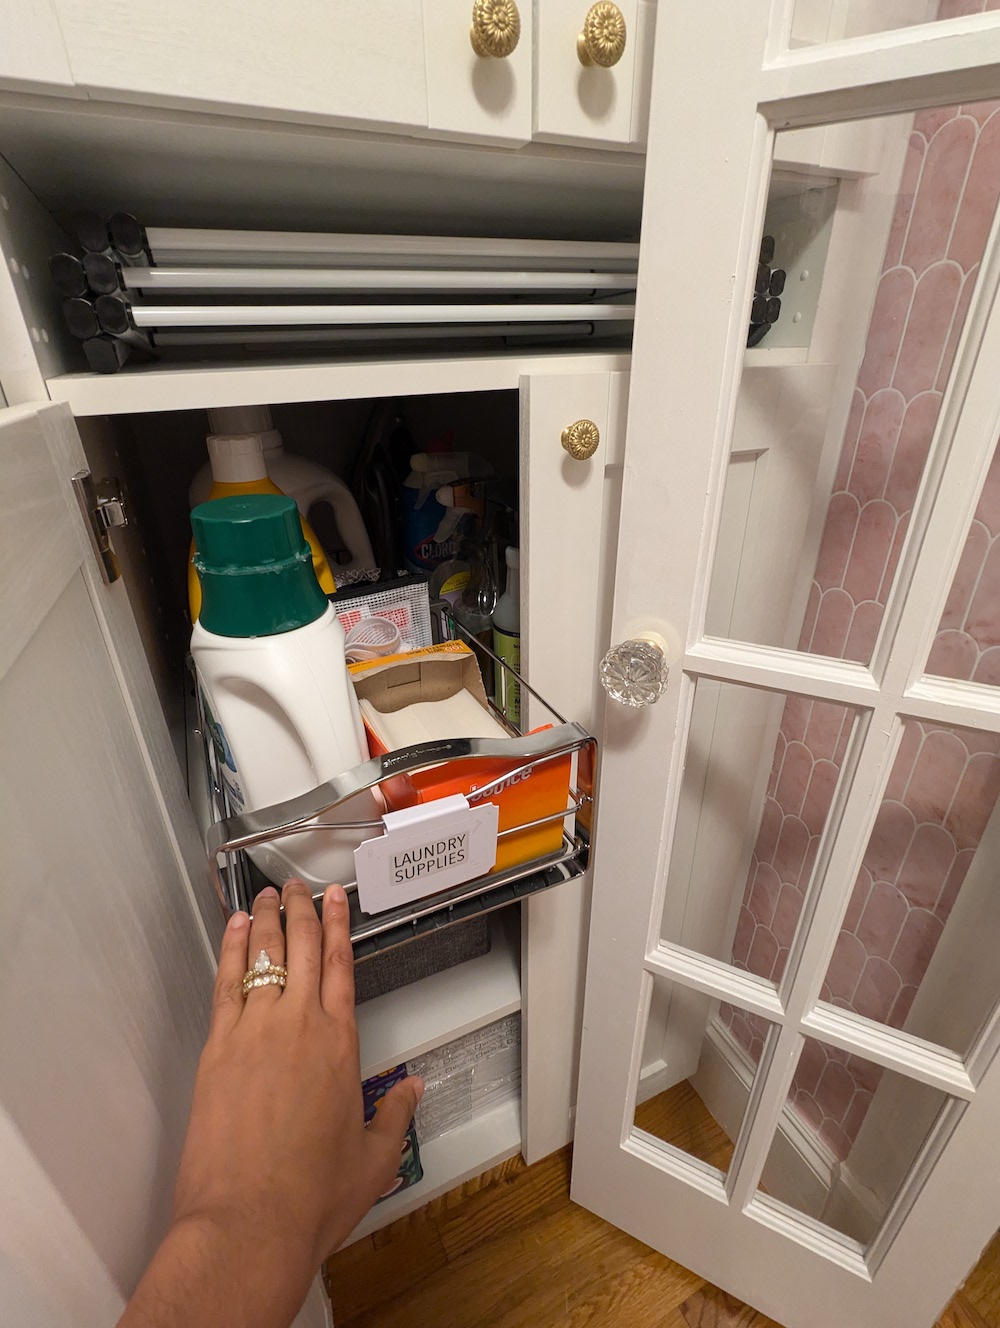
Half cabinet access. The doors to the room must be fully open when I’m entering and exiting with a laundry basket. Luckily, Ikea makes 12” wide cabinet doors, so I can access the left half of the cabinet (and pull out this 9” organizer) even with the French doors open!
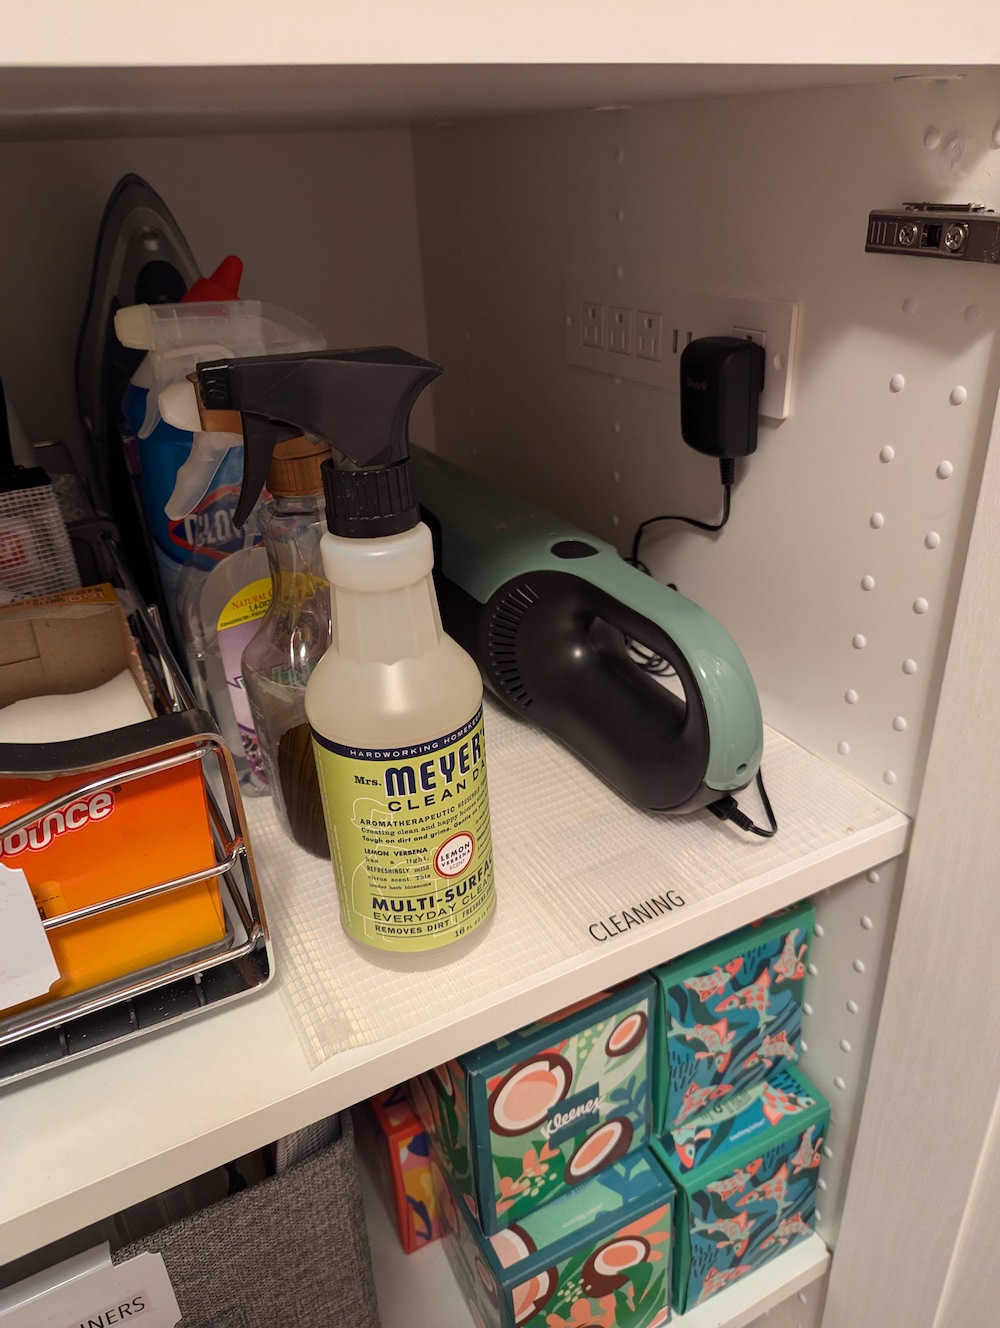
Inside-cabinet outlet. Thanks to our recessed outlet extension, our handheld vacuum finally has a home! I filled the predrilled shelf peg holes with removable plastic plugs to allow for shelf height switch-ups later on as needed.
Step 3: Custom Cabinetry Built-Ins
I hired a carpenter to finish the custom cabinet above the stacked washer/dryer before the start of the school year. Rather than moving the washer/dryer out of the room beforehand, they built cabinetry around the appliances in place, which led to some foreseeable problems…
![]() Problem 1: The dryer smells like fire!
Problem 1: The dryer smells like fire!
The evening that my carpenter left, I tried to dry a wet floor towel (that our kiddo had dumped bath water onto). A horrible burning smell and steam started to fill the room!


I called the Dryer Vent Wizards (highly recommend!), and they found and fixed a couple of problems the next morning…
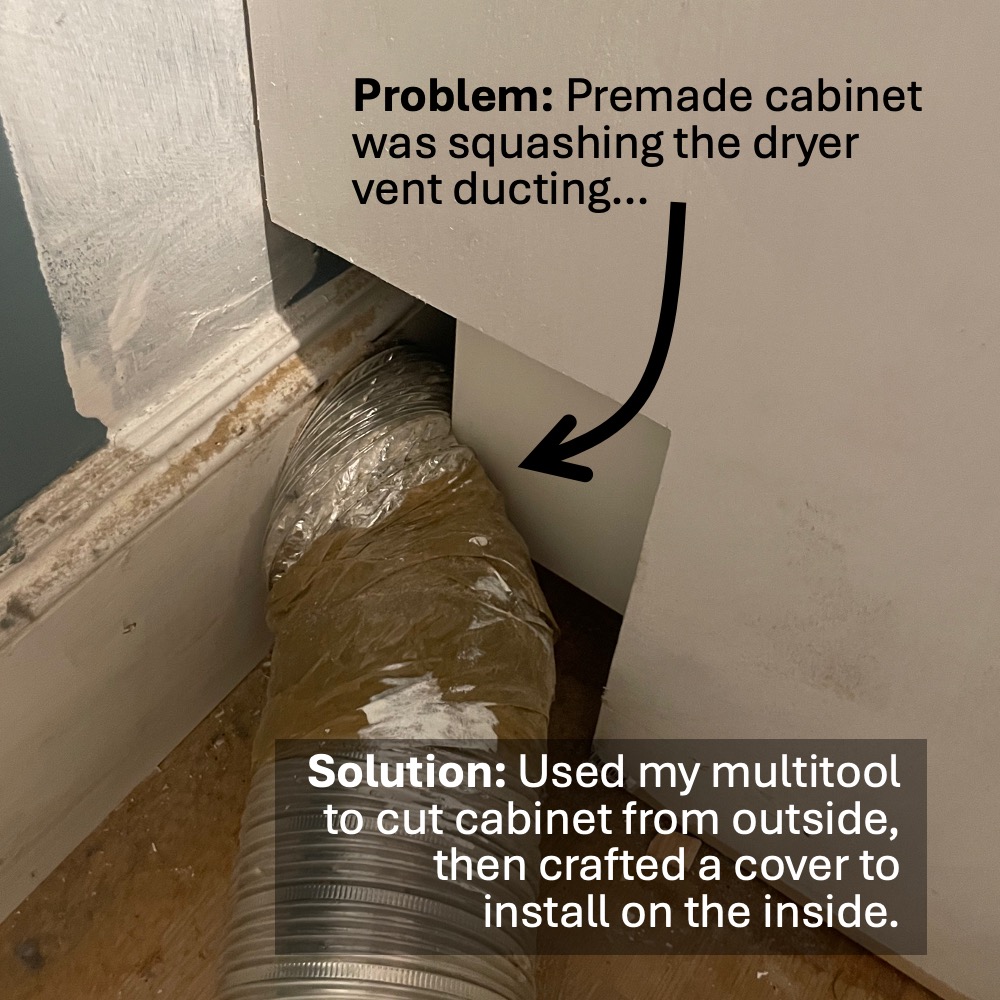
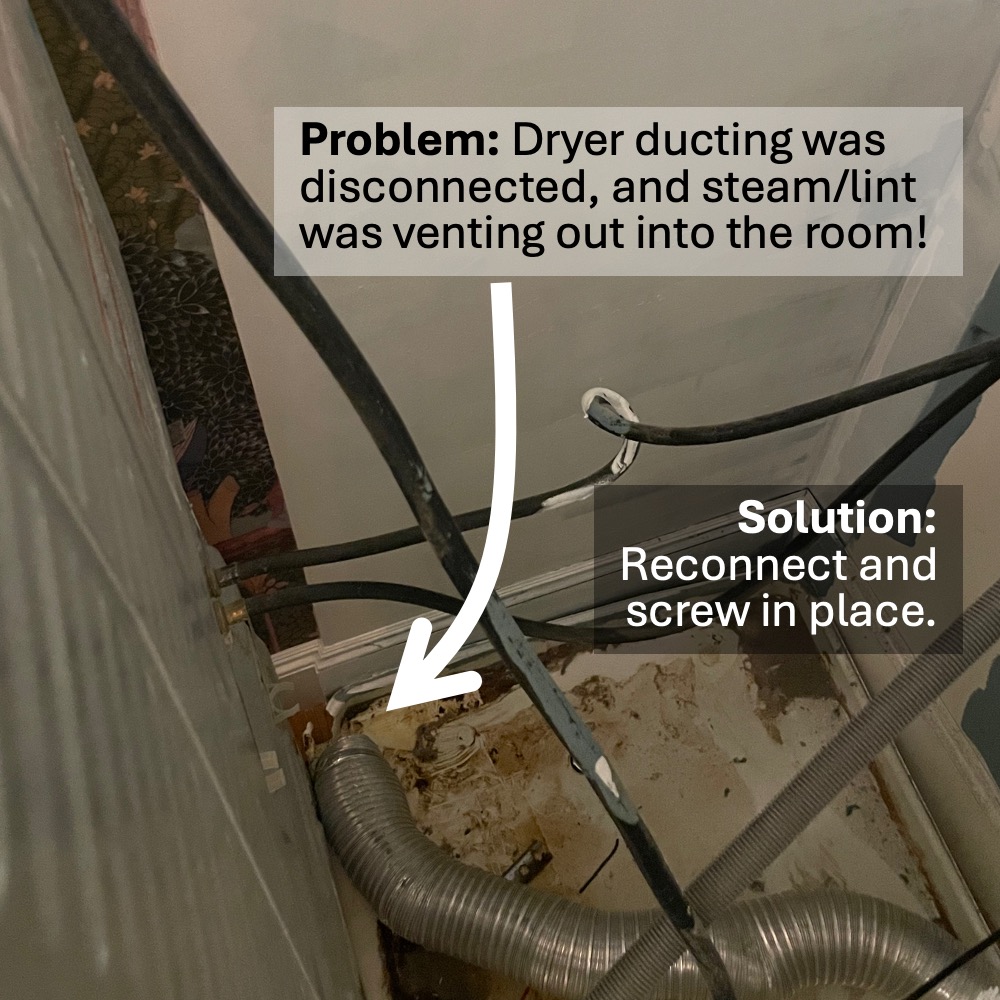
Unfortunately, this led to another new problem…
![]() Problem 2: The washer is leaking!
Problem 2: The washer is leaking!
Because the washer/dryer are screwed together in the back and could not be lifted without damaging the cabinets, we needed to pull the connected units straight out, which destroyed the drip pan front lip.
Our washer (like many older, “high efficiency” load-sensing units) sometimes has an excess suds overflow leak.

We live in a 3rd-floor condo, and I panicked seeing water all over the floor!
Getting a new drip pan in there was tricky!
| Idea! |
Womp Womp |
|---|---|
| move W/D in separately |
|
| drop W/D in together |
|
| slide W/D in with the drip pan underneath |
|
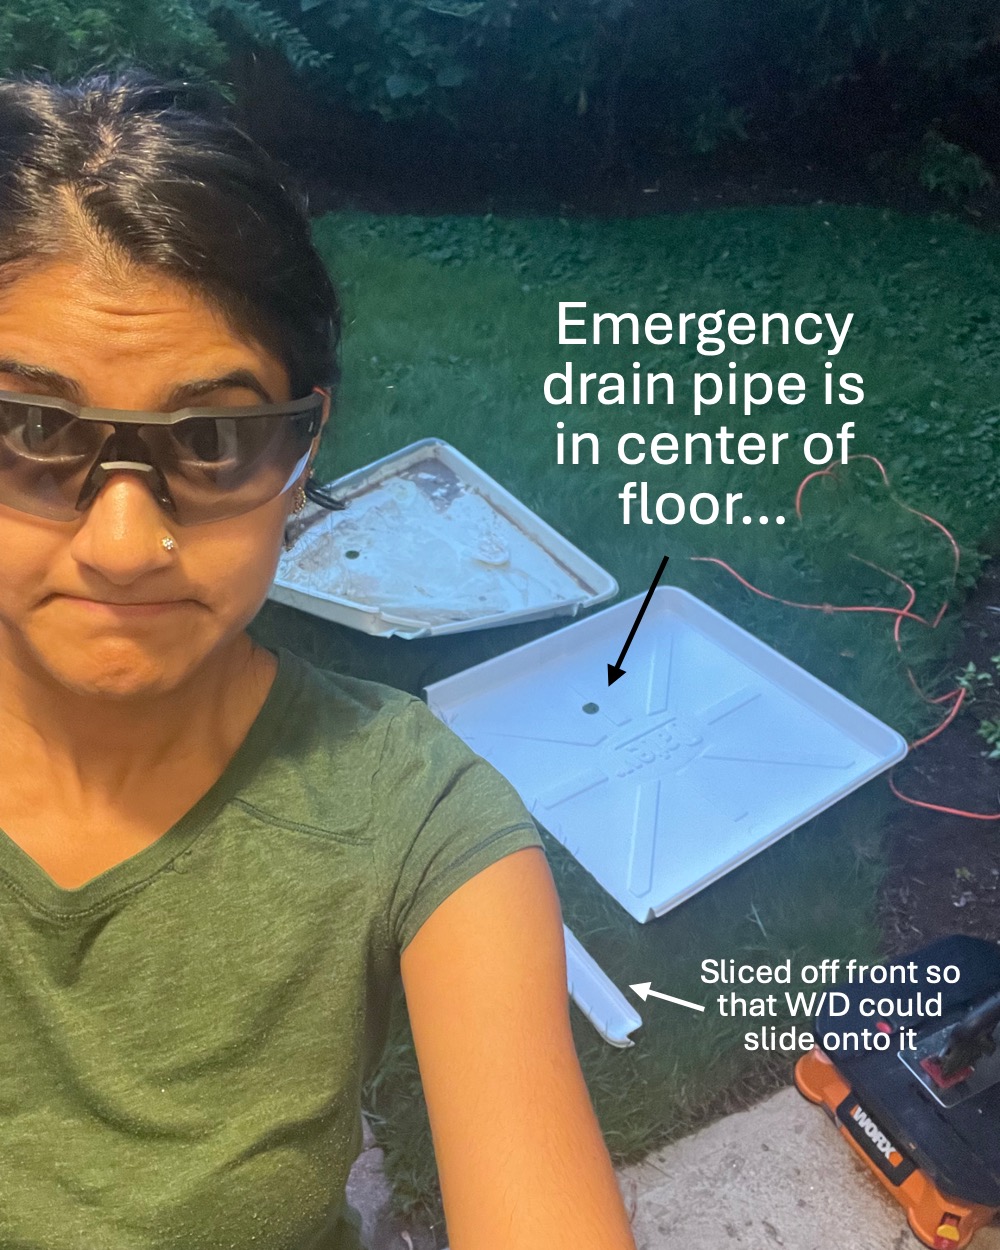
My solution! ![]()
![]()
- Cut the front off a new appliance drip pan, predrill drain hole, and install it around drain pipe first.
- Slide the stacked washer/dryer into place over drip pan.
- Cut another new drip pan to get front lip + 6”.
- Lift the front of washer/dryer with manual jacks and push new drip pan front into place.
- Duct-tape the drip pan halves together and seal with clear silicone caulk.
Step 4: Organization 
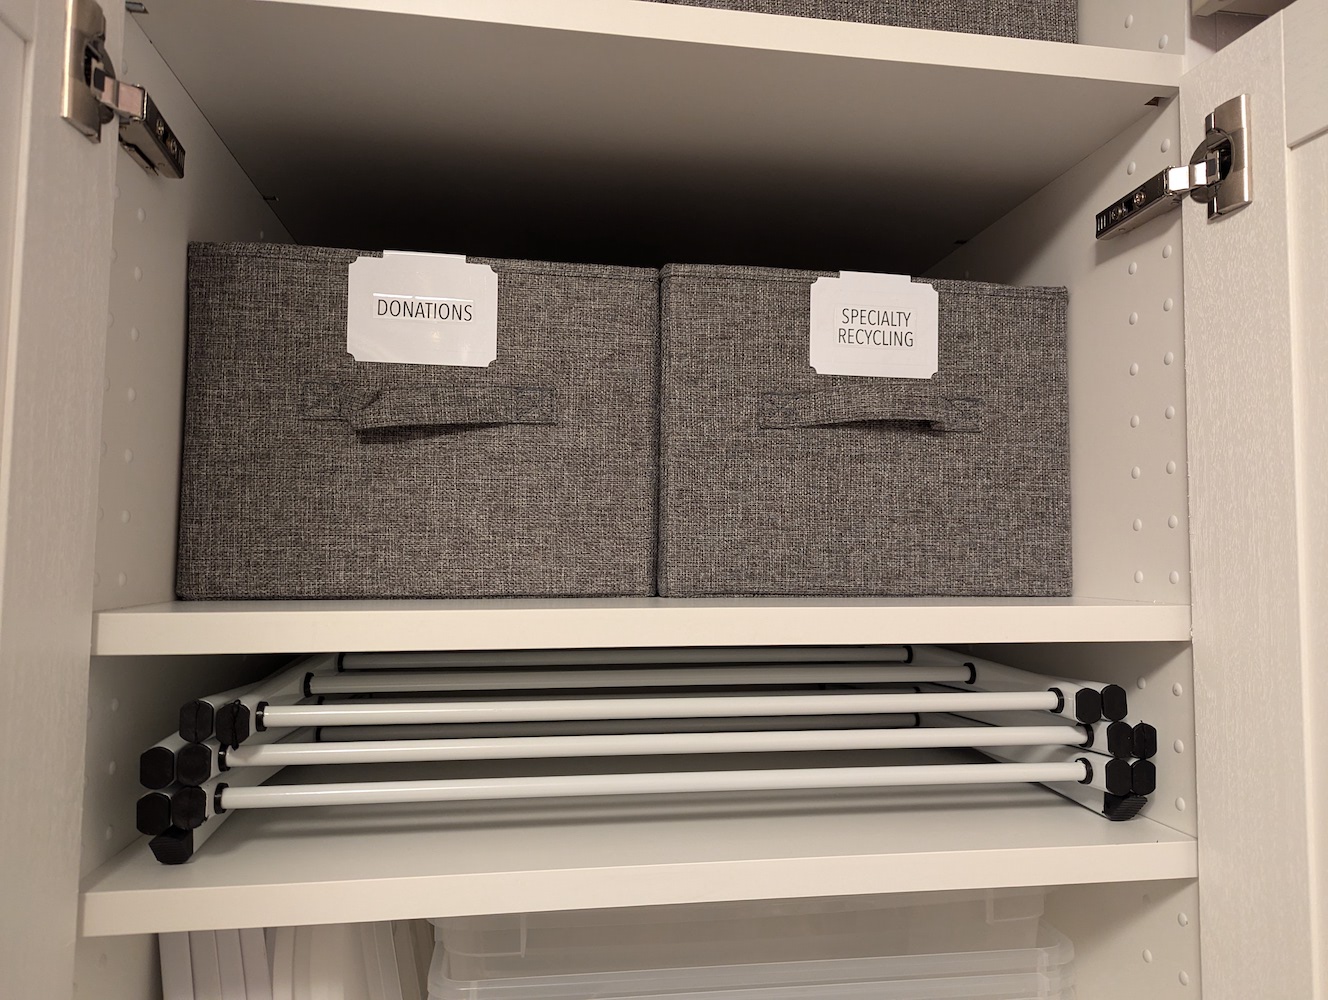
I always planned for the cabinetry in this room to store
extra comforters (for guests) ![]() ,
specialty recycling
(textiles, electronics)
,
specialty recycling
(textiles, electronics) ![]() ,
donations,
extra air filters
,
donations,
extra air filters ![]() , tissues
, tissues ![]() and toilet paper
and toilet paper ![]() .
I also now hide wrapped gifts in the top shelf bins
.
I also now hide wrapped gifts in the top shelf bins ![]()
![]() .
.
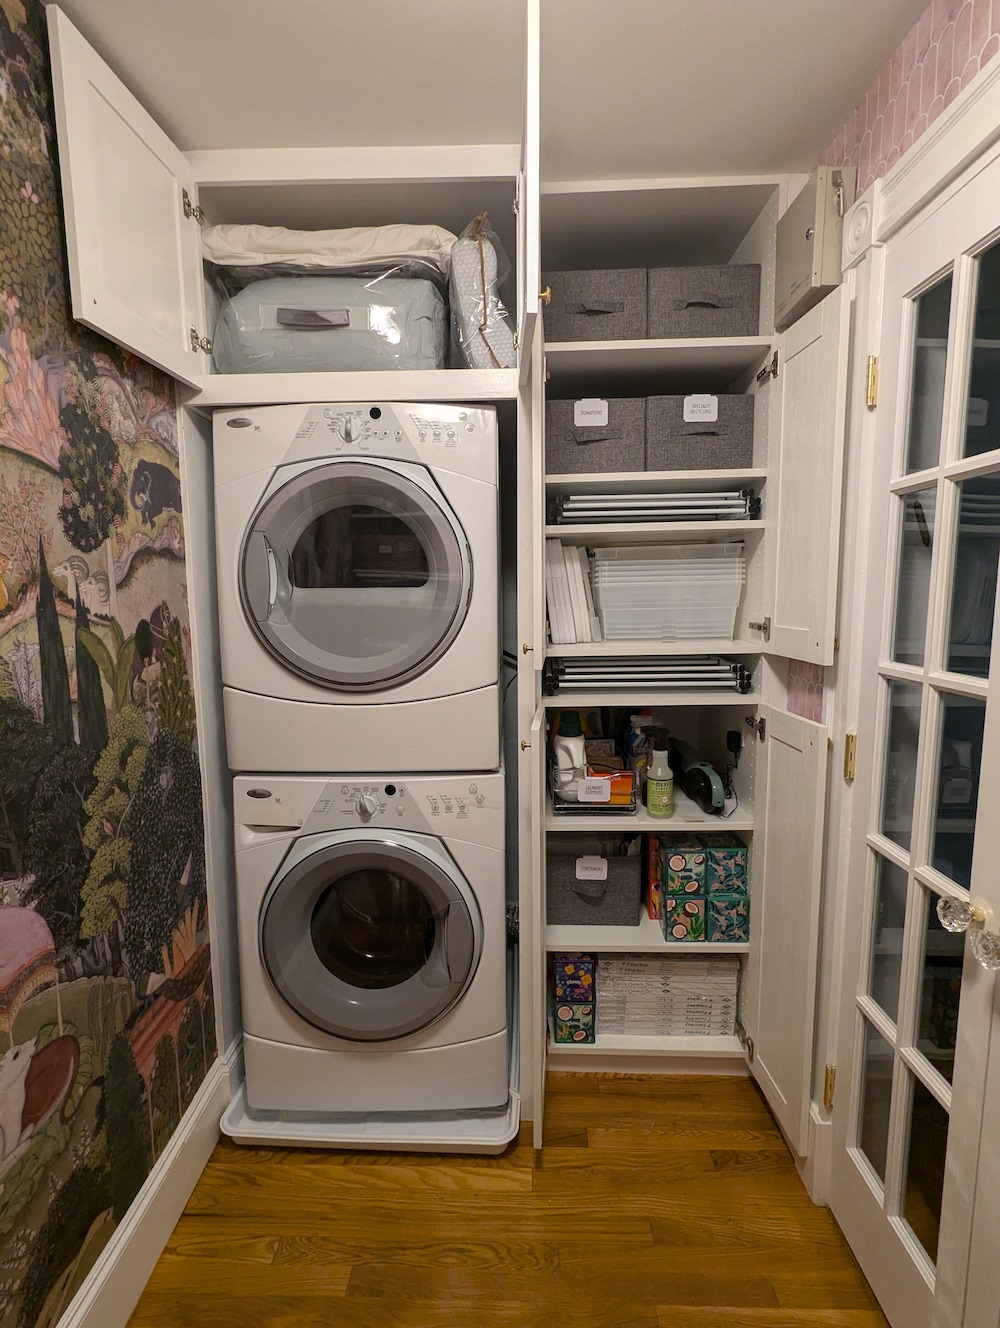
I found these extra-deep cloth bins, bin clip labels, and fantastic compact dry racks, all of which are working out perfectly in this 24” wide cabinet!
Cost breakdown
Achievement unlocked! ![]() For the first time ever, I was actually able to save a good amount money by
reusing supplies that I already had on hand!
For the first time ever, I was actually able to save a good amount money by
reusing supplies that I already had on hand! ![]() For this project,
I reused my oscillating multitool,
orbital sander,
tabletop BladeRunner saw, and
trigger clamps. I even had enough
wood putty,
wood glue,
paintable caulk* (and
caulk gun),
clear silicone sealant caulk*,
white duct tape,
Rust-Oleum white primer for plastic,
Benjamin Moore Fresh Start primer,
color-matched pink and white
semi-gloss paint,
grippy contact paper,
and glue dots leftover from previous projects !
For this project,
I reused my oscillating multitool,
orbital sander,
tabletop BladeRunner saw, and
trigger clamps. I even had enough
wood putty,
wood glue,
paintable caulk* (and
caulk gun),
clear silicone sealant caulk*,
white duct tape,
Rust-Oleum white primer for plastic,
Benjamin Moore Fresh Start primer,
color-matched pink and white
semi-gloss paint,
grippy contact paper,
and glue dots leftover from previous projects !
*Sealing the top of a caulk tube with a metal screw keeps it from drying out.
| Materials | Cost (+ tax/shipping) |
|---|---|
| bifold French doors | 563.08 |
| Ikea Sektion tall base cabinet, 2 30” doors, 2 40” doors, 3 shelf pair packs, 4 soft-close hinge pairs | 499.44 |
| dryer vent repair technician visit | 274.00 |
| 2 sheets 4’x8’x0.6” pine plywood | 106.21 |
| 2 compact accordion-style dry racks | 70.10 |
| 2 washing machine drip pans | 65.88 |
| SimpleHuman 9” pull-out cabinet organizer | 60.00 |
| 2-pack manual lift jacks | 48.35 |
| 20” deep cloth bins (5-pack) | 46.74 |
| 1 quart Chantilly Lace semi-gloss paint | 46.74 |
| 6 round flower brass knobs | 38.23 |
| 2 ball catch mechanisms | 37.97 |
| recessed outlet extender | 35.05 |
| 0.5” overlay cabinet hinges (2 pairs) | 27.48 |
| mortise-style door knobs | 24.85 |
| 3 packs 3/16” plastic hole plugs | 22.28 |
| wireless light switch receiver | 21.24 |
| 6-pack 3.5” brass door hinges | 18.88 |
| white plastic access panel | 17.36 |
| 1” hole saw attachment for power drill | 15.93 |
| bin label clips | 8.49 |
| 1-gang white switchplate cover | 1.04 |
| TOTAL | $2049.34 |
Check out how I finished the utility half of the laundry room, too! Feels great to have this tiny and (now) amazingly functional room complete!

Shilpa Kobren is the Associate Director of Rare Disease Analysis at Harvard Medical School where she focuses on analyzing genomic sequencing data with patient clinical information to derive insights into human diseases. Shilpa lives in an 1890s urban apartment in Cambridge, Massachusetts with her husband and two energetic toddlers. She retains her sense of peace amid the chaos by creating and iteratively improving systems that optimize daily efficiency in her family's constrained living space.