The phrase “technical debt” refers to the unavoidable cost of future maintenance or
reworking of a (software) system where speed/hacks
were prioritized over quality during development. ![]()
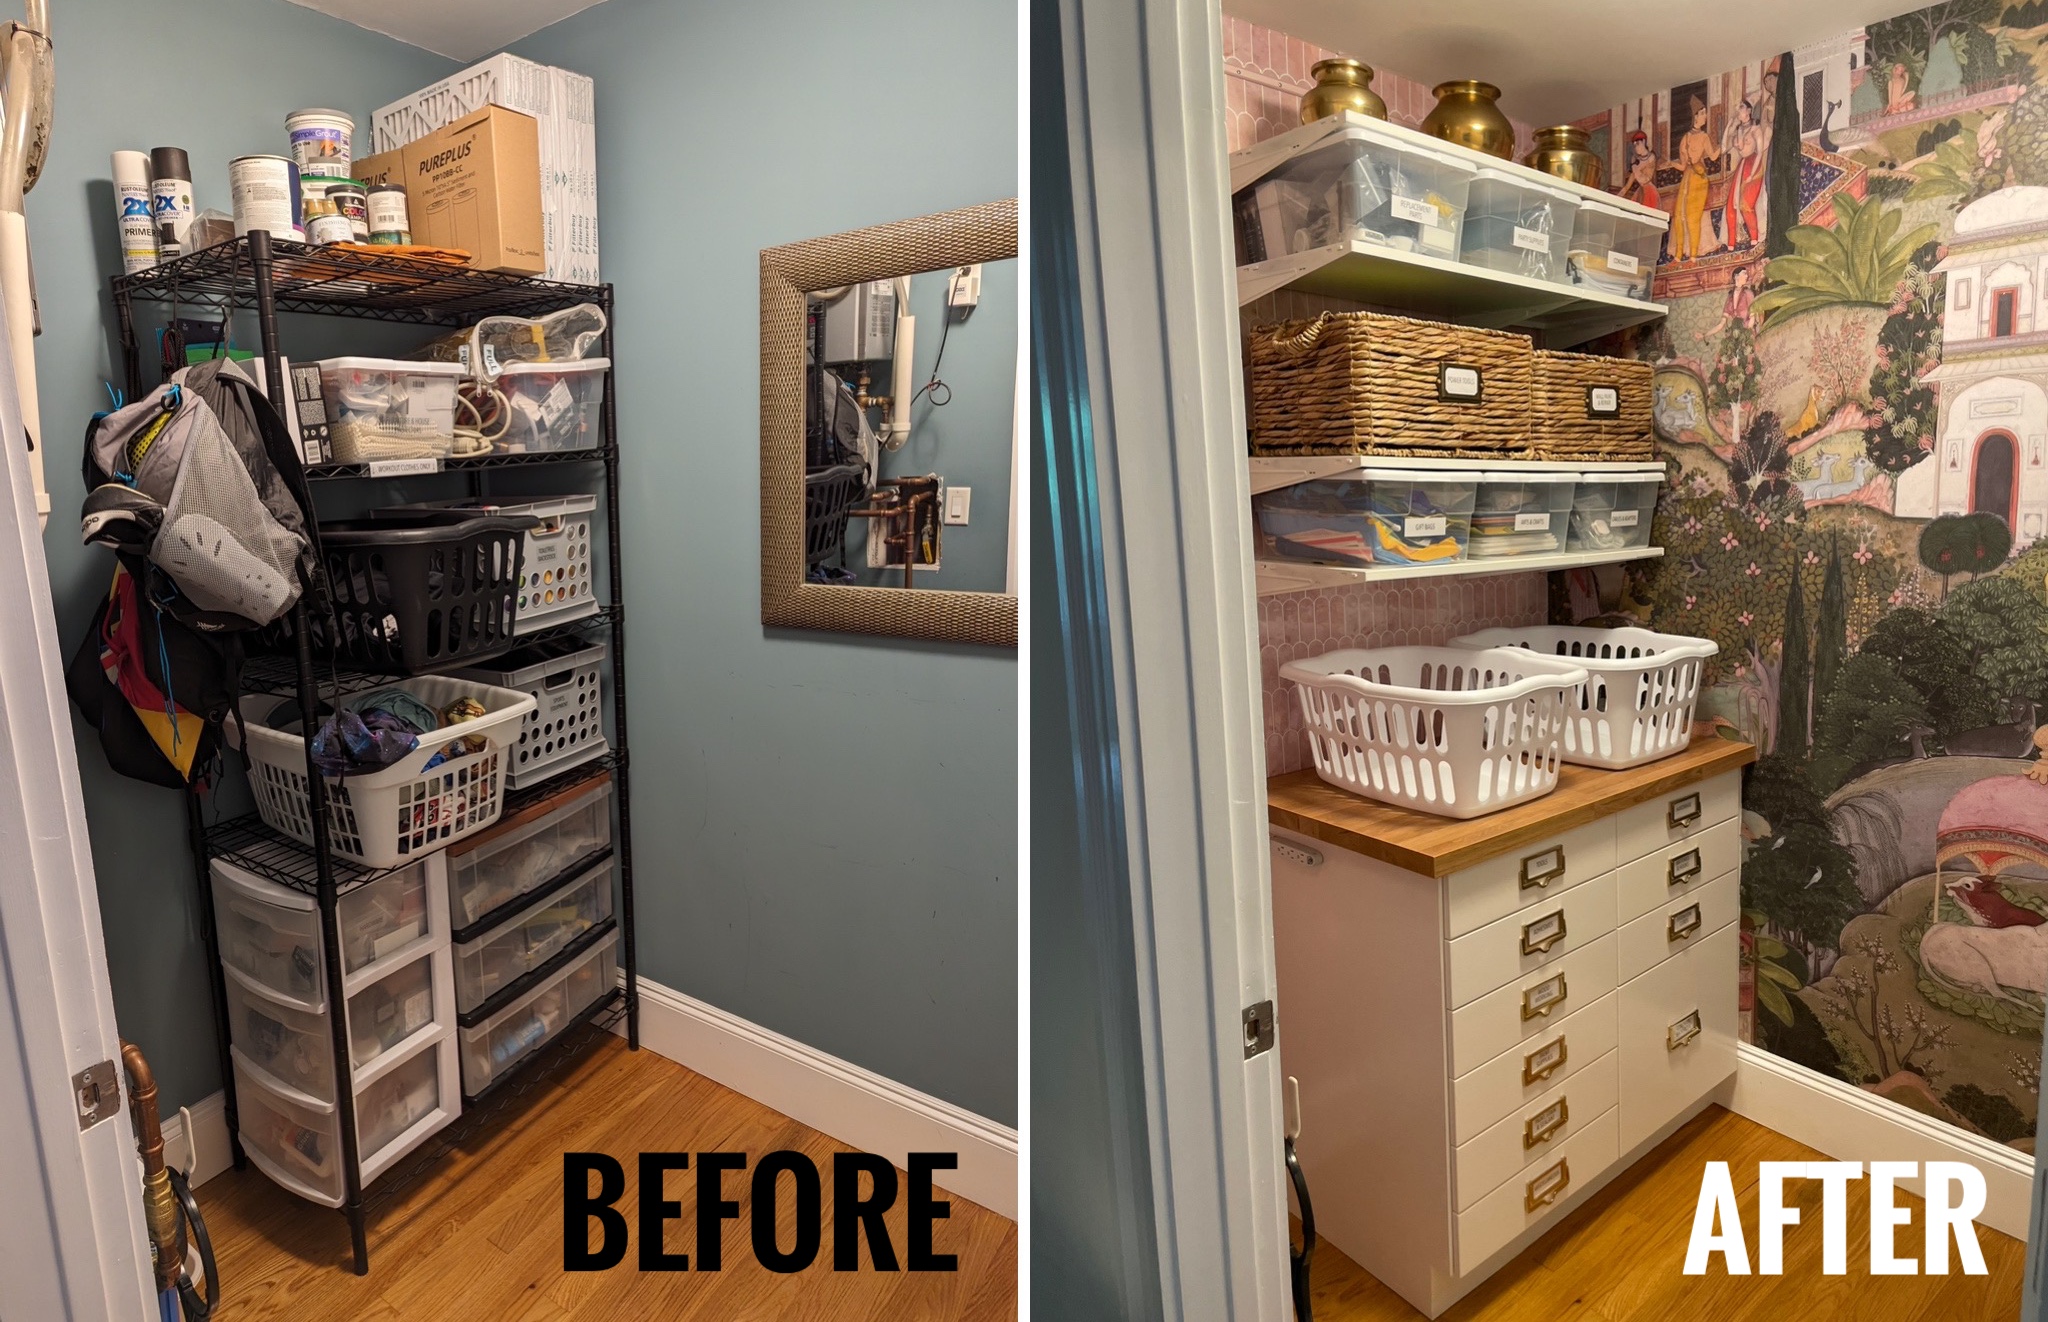
![]() My “utility” corner of the laundry room had accumulated enough debt to render it nonfunctional.
My “utility” corner of the laundry room had accumulated enough debt to render it nonfunctional. ![]()
![]()
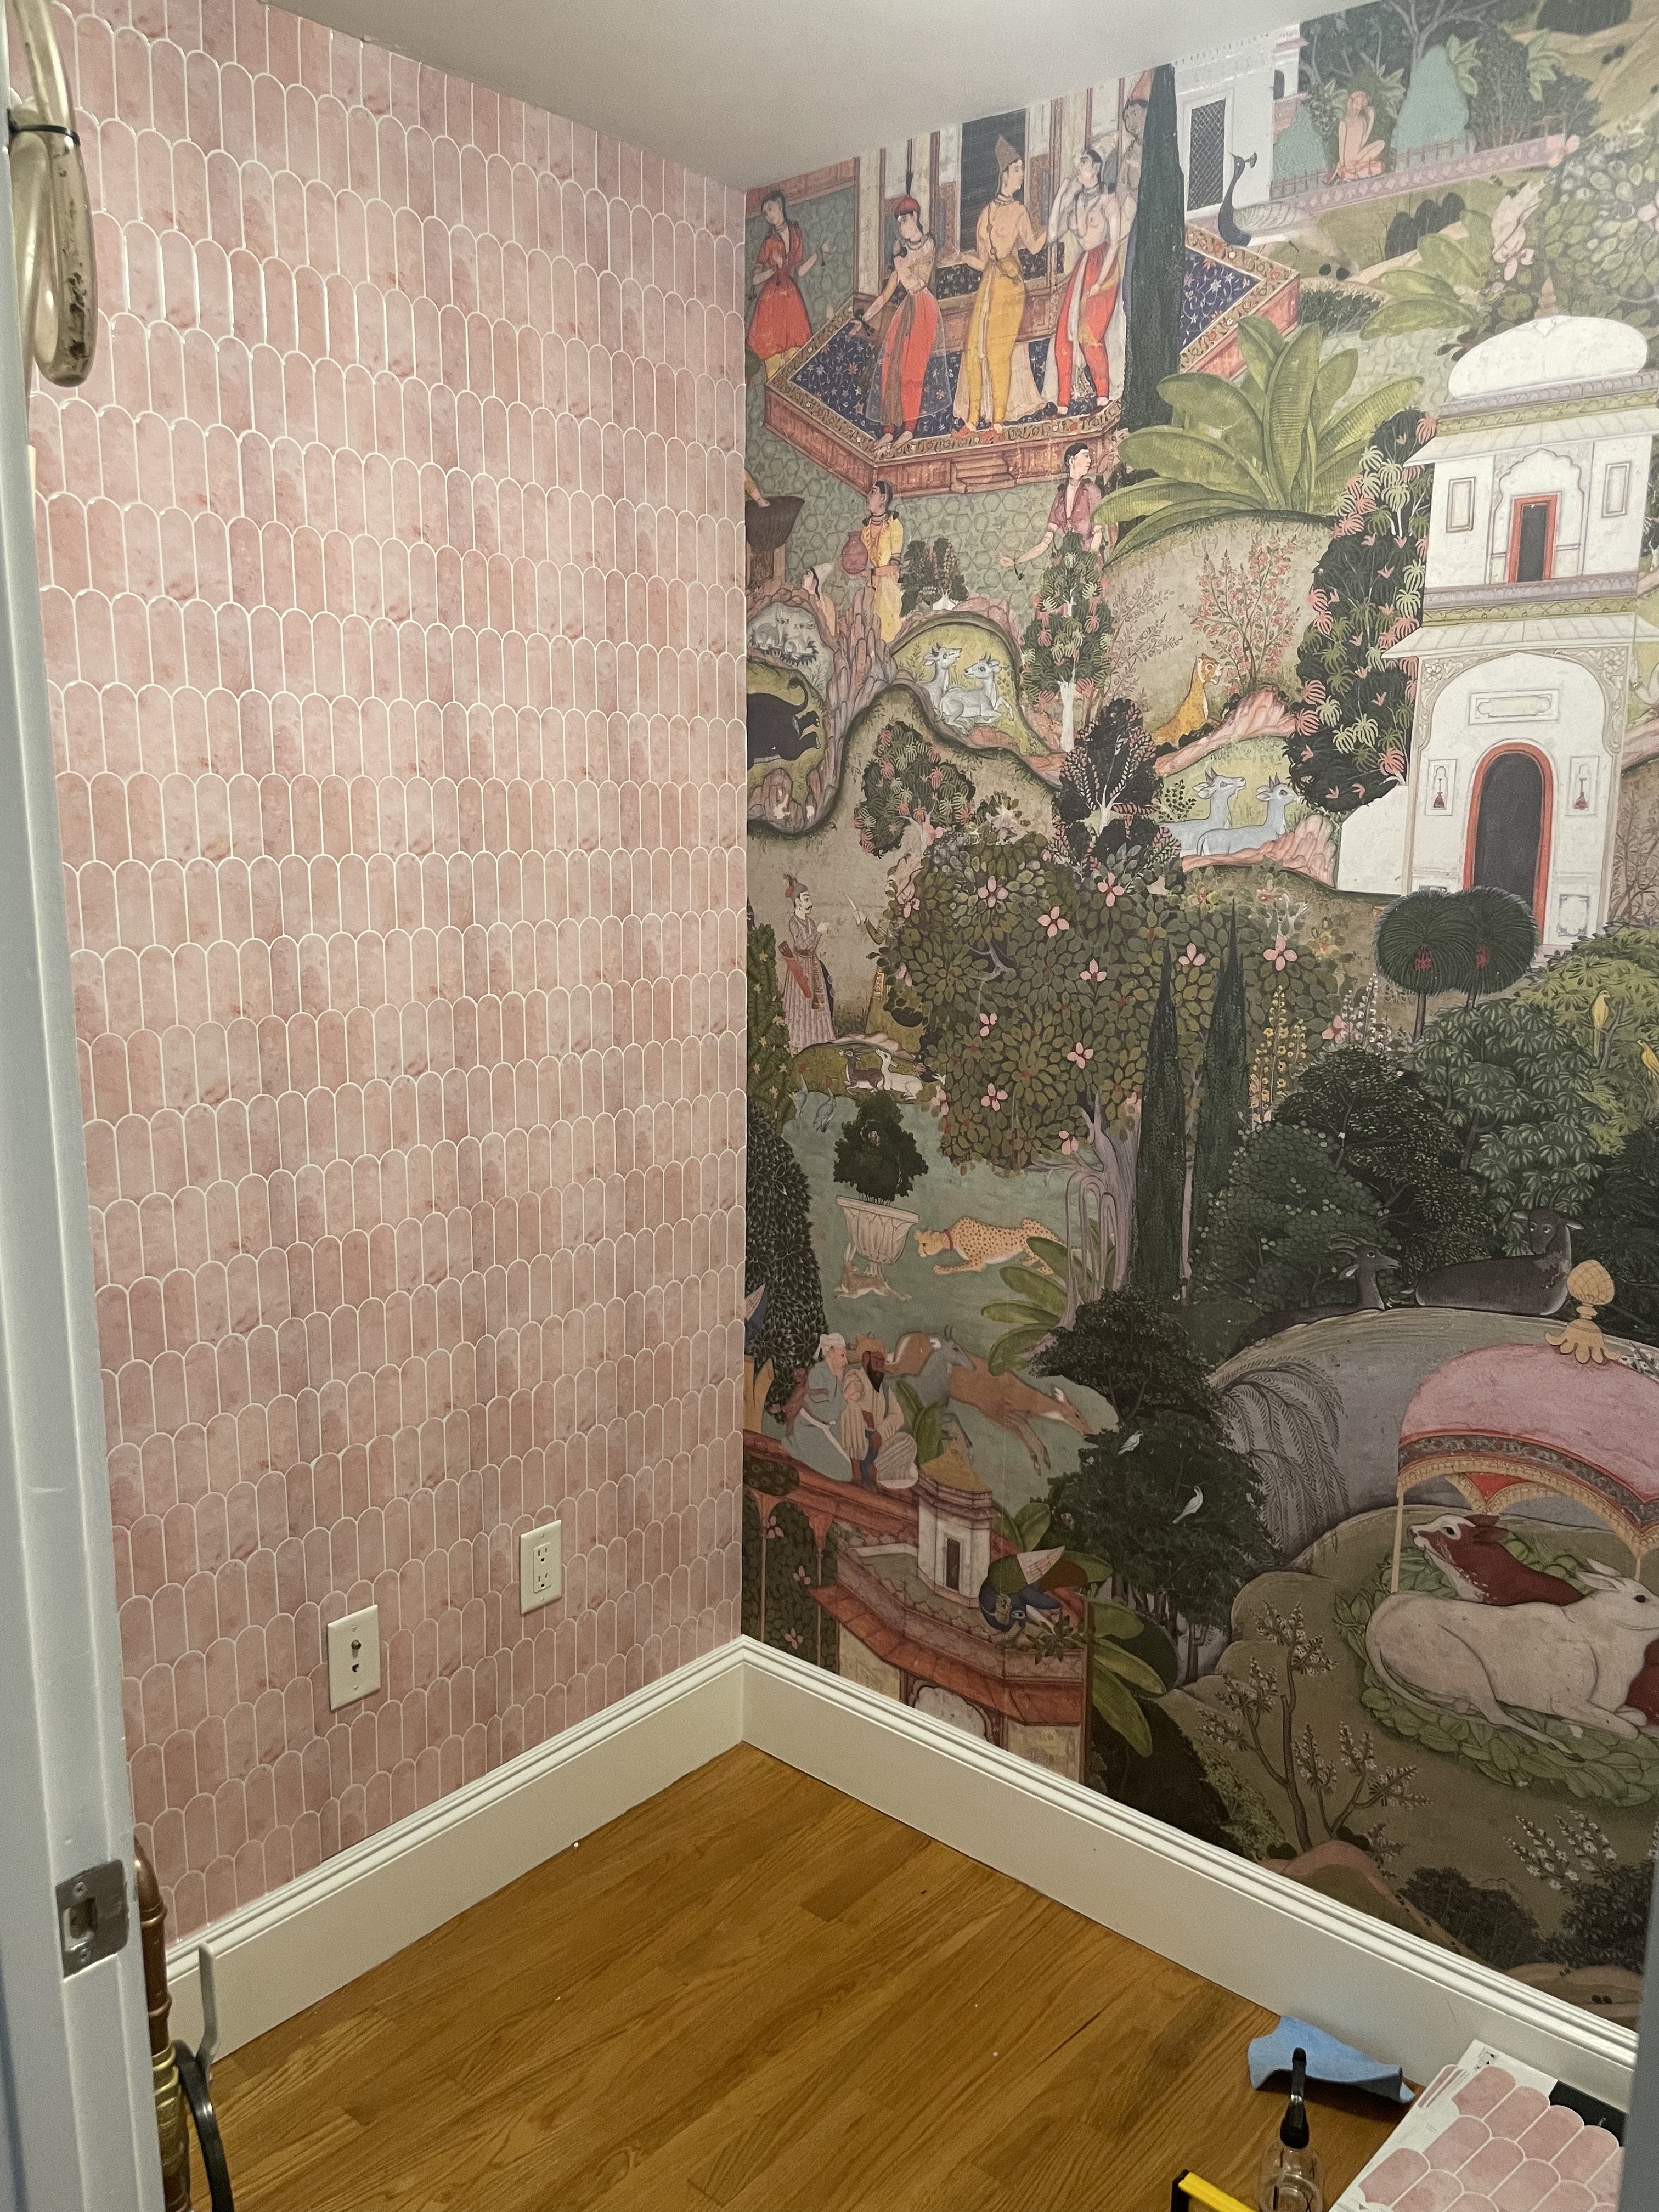
I had already mentally redesigned the space for efficiency, but it wasn’t until I saw (a targeted ad for) the wallpaper “Gardens of Jaipur” from Marble Lotus that I decided to finally start the project. Surveillance capitalism at its finest!
Constraints
- Small things (e.g., tools, screws) are organized and visible (i.e., single layer).
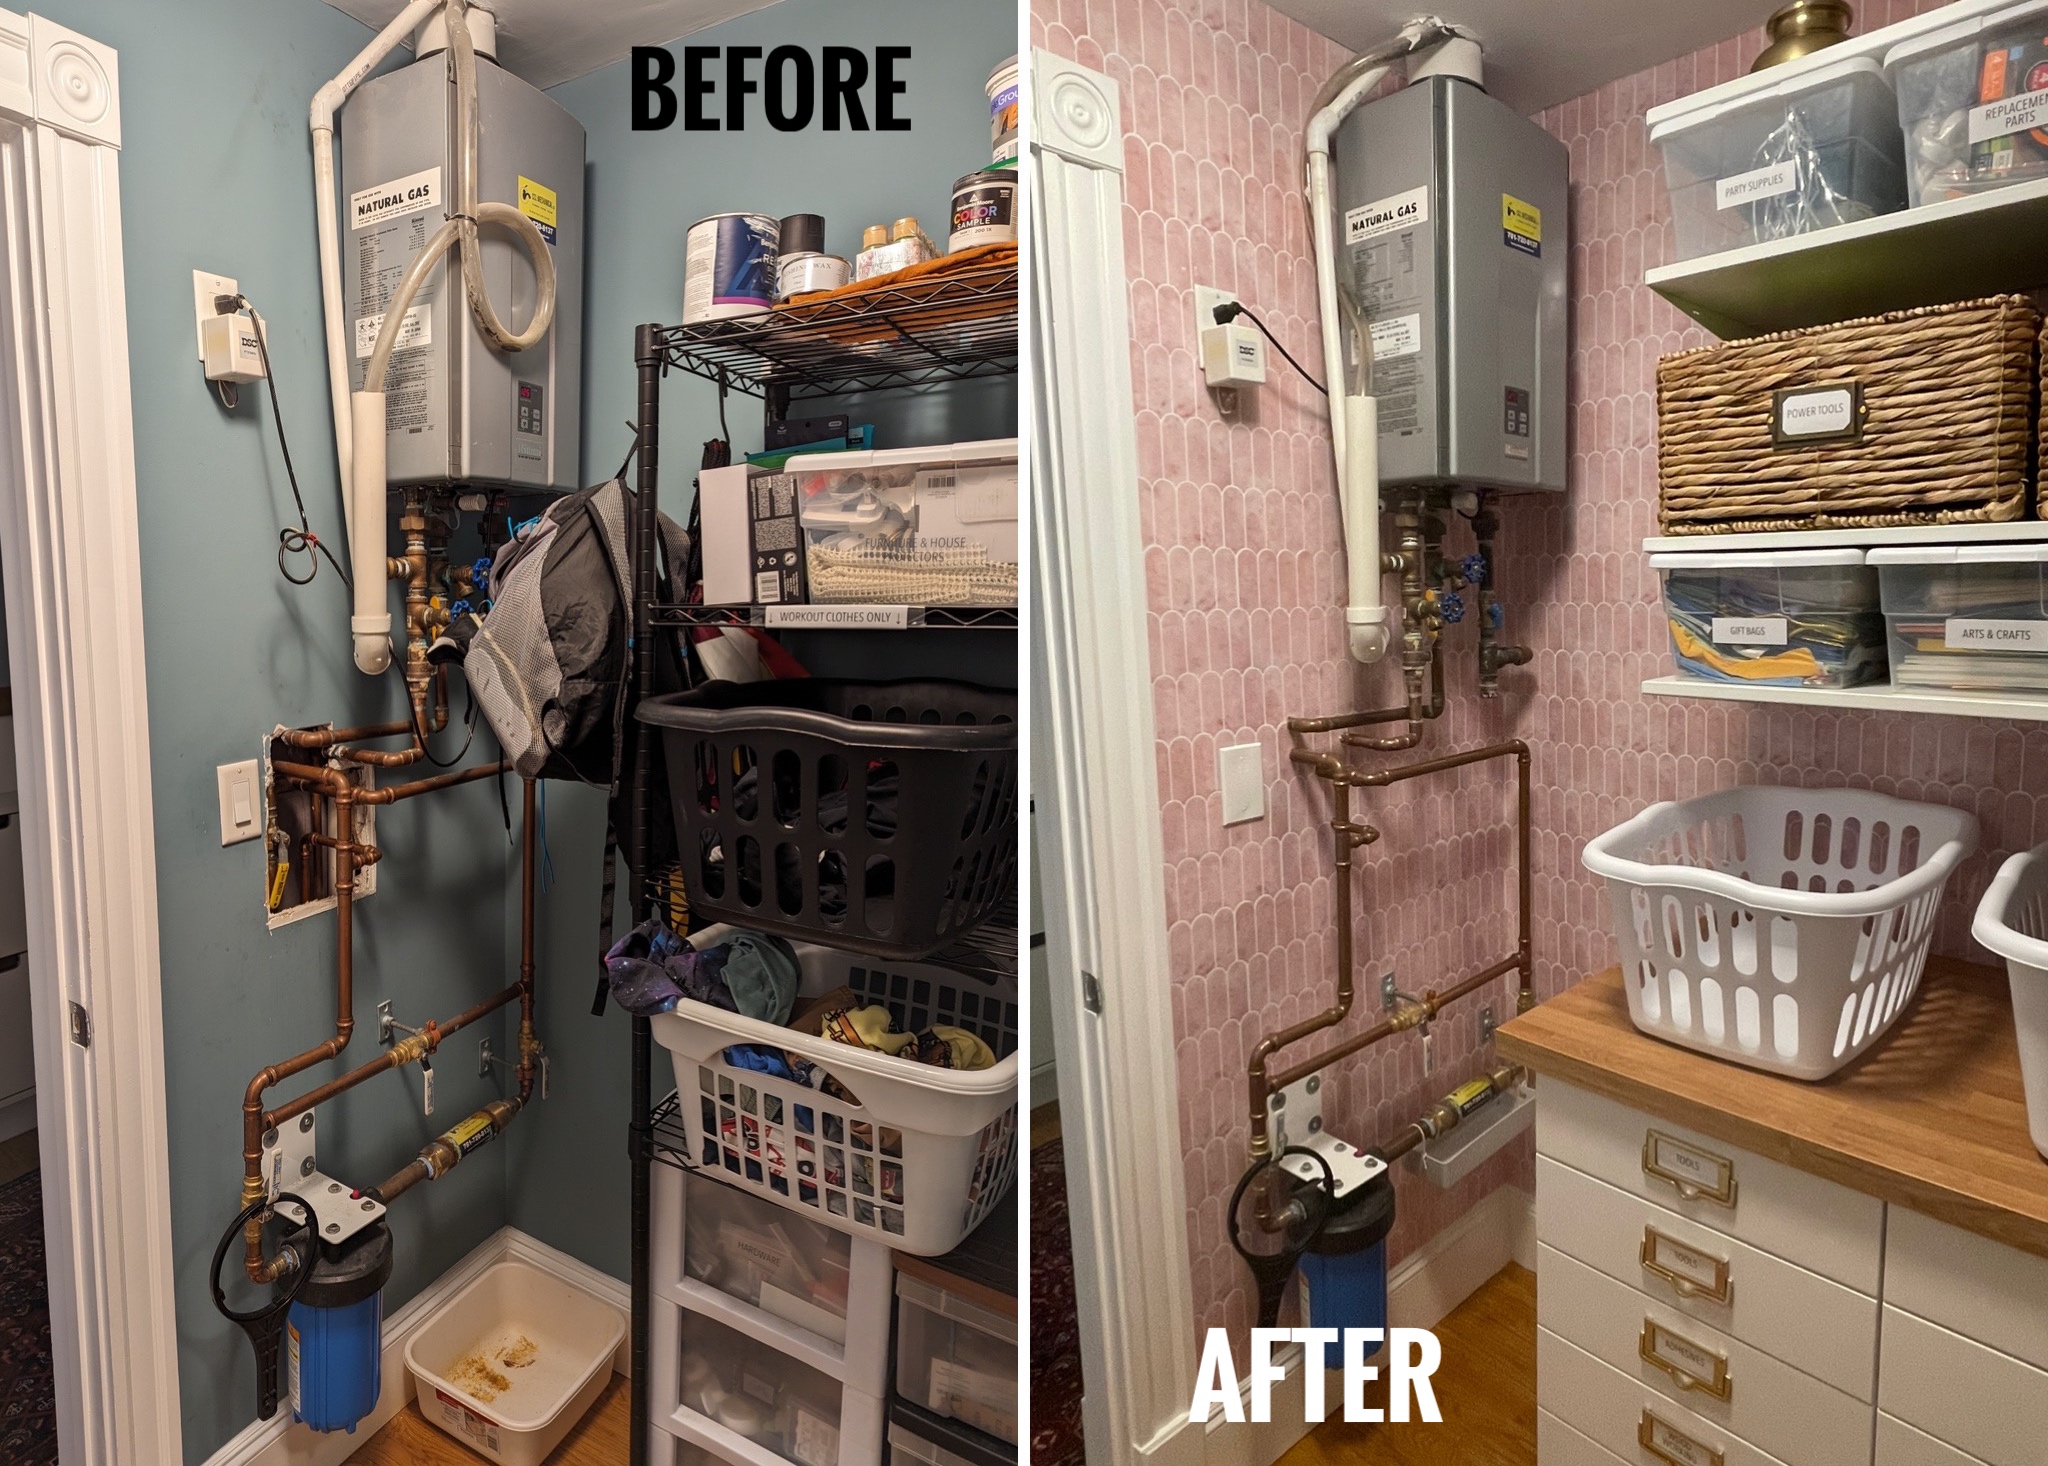
- Water heater and water main filter are fully accessible if needed.
- Everyone in the family can find what they need without asking me.
Before-and-Afters!
I’ll get you amped up with some extremely satisfying before-and-afters before I share all the details! ![]()
The Process
Feel free to skip ahead to any of the following steps of this project:
- Step 1: Wallpapering, drywall patching
- Step 2: Cabinetry construction
- Step 3: Flexible open shelving
- Step 4: Organization!
Step 1: Wall covering.
I ordered a peel and stick version of the wallpaper I liked from Giffy Walls for the exact dimensions of my wall.
![]() Here I am installing wallpaper the same night it arrived (at 11:30 P.M.) because I have no chill.
Here I am installing wallpaper the same night it arrived (at 11:30 P.M.) because I have no chill.
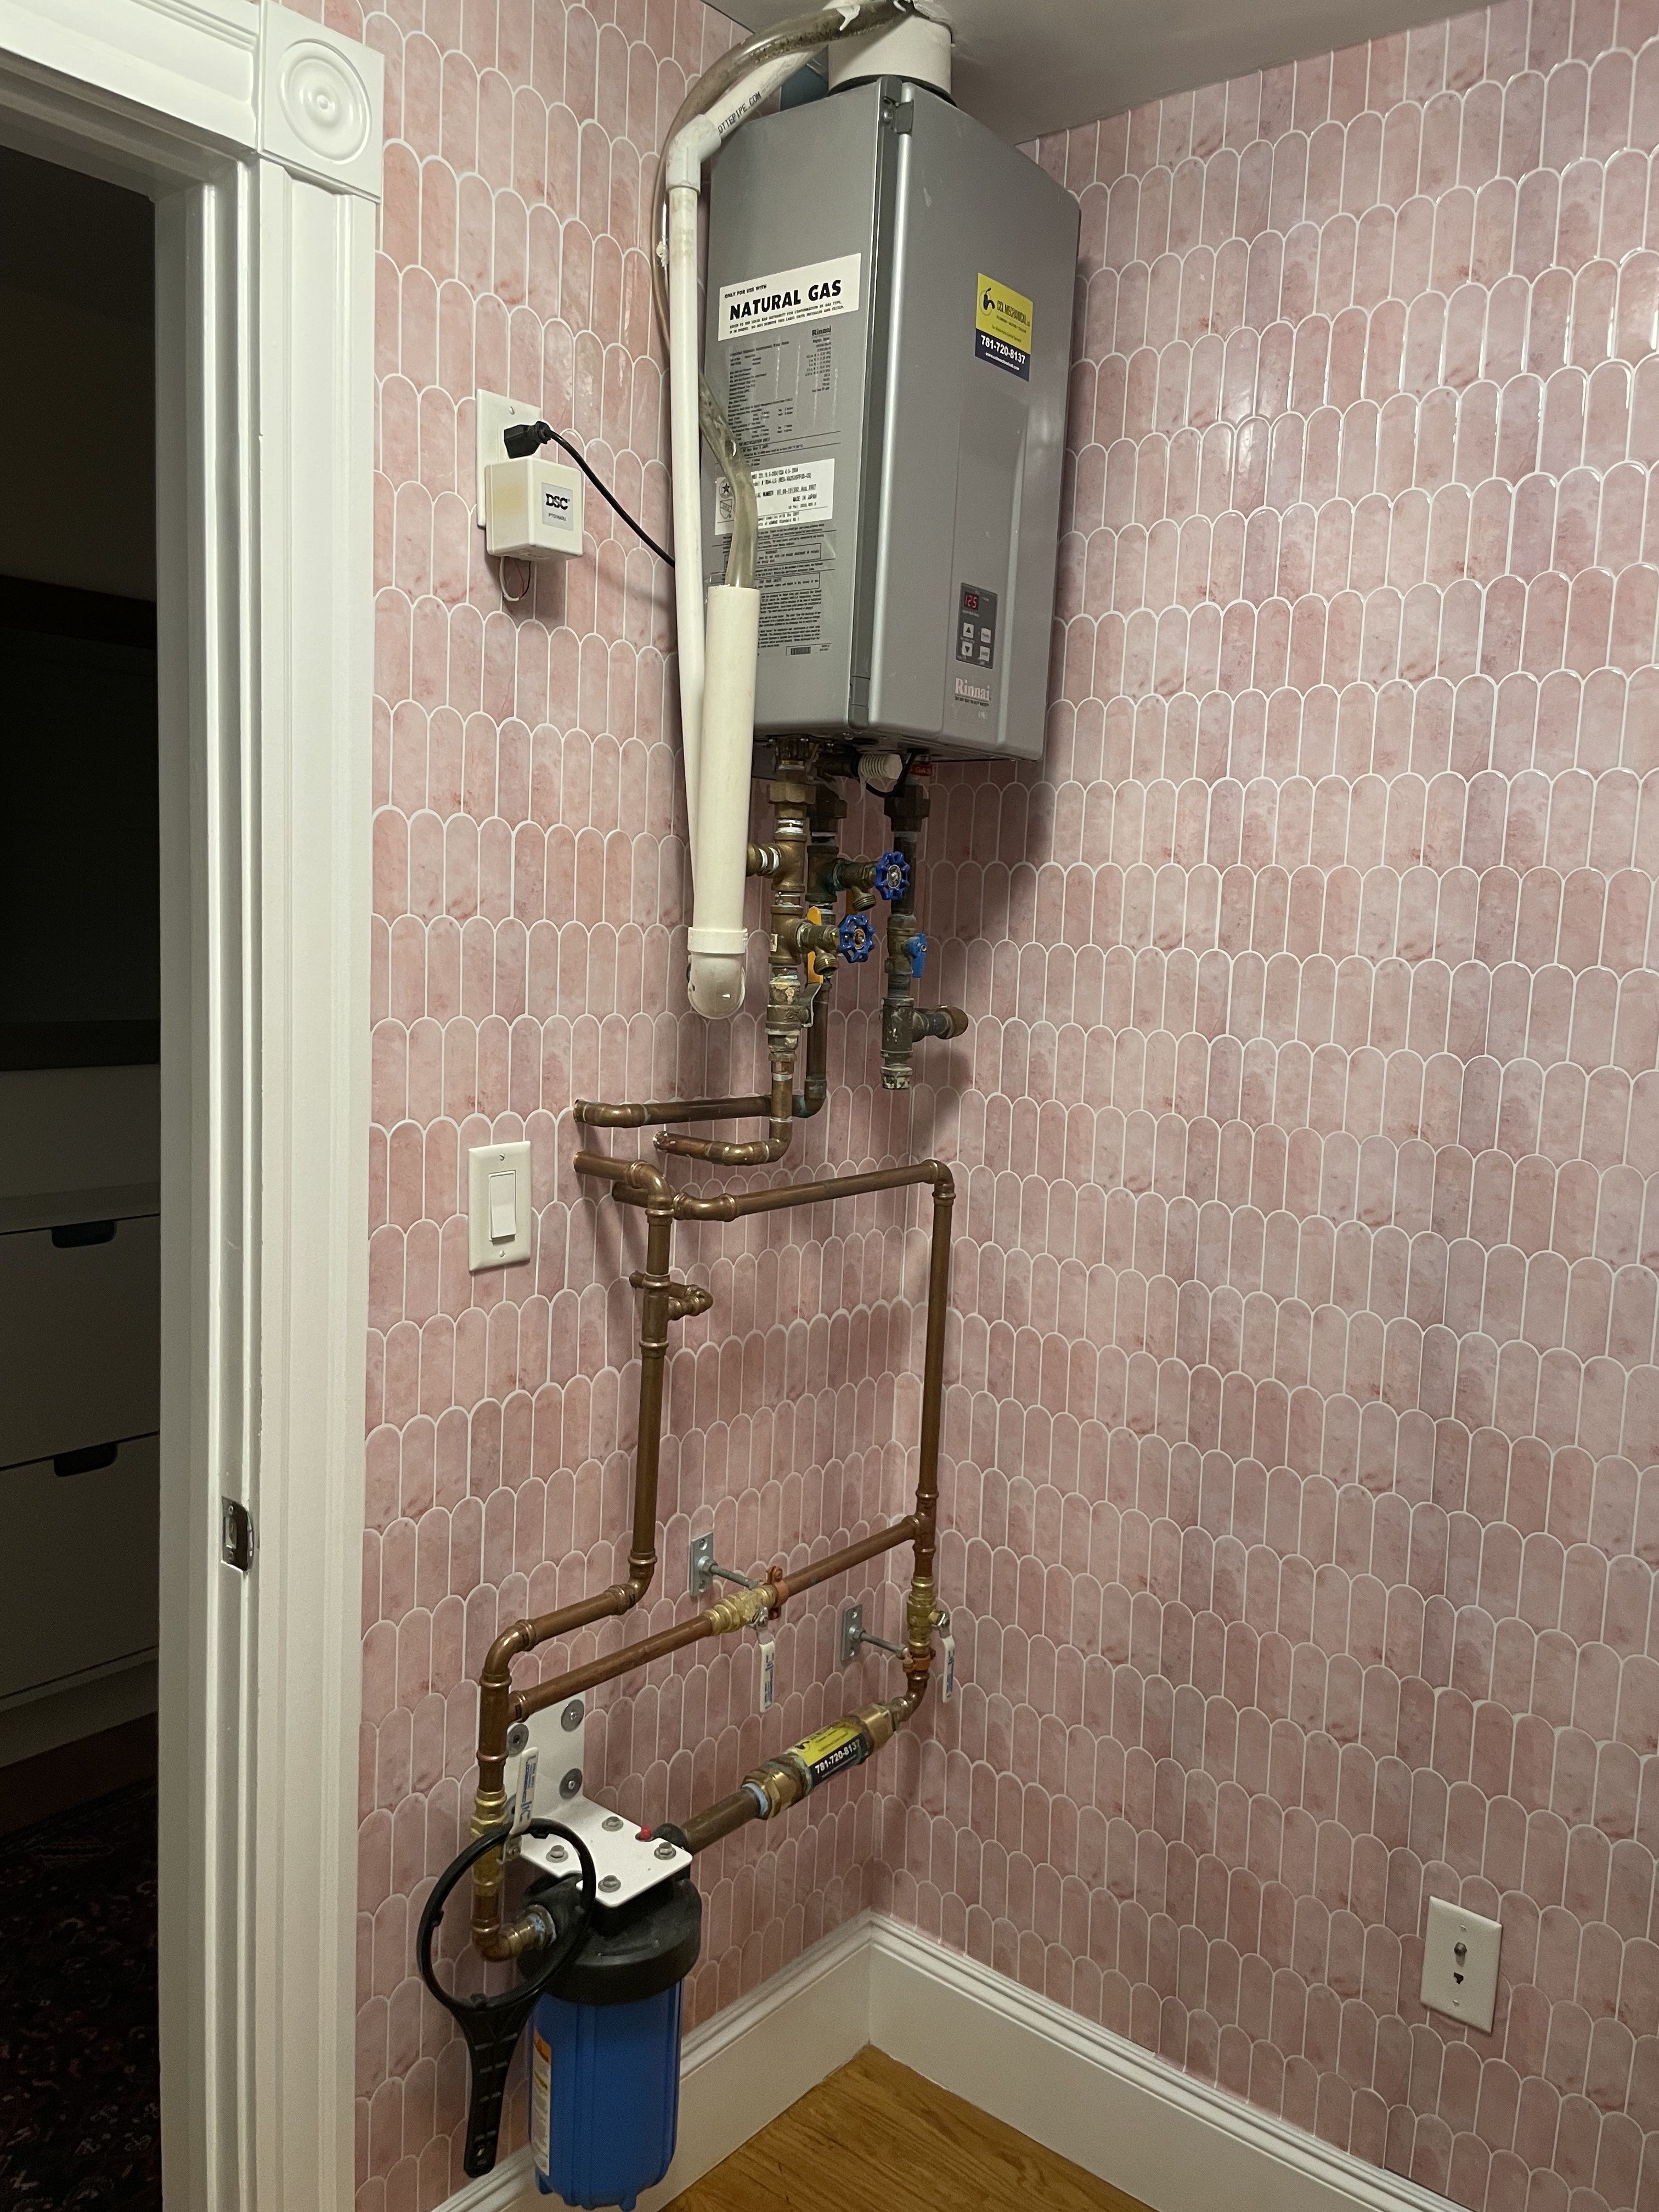
I found Art3D peel and stick pink marble tile for the other walls as well, which matched the wallpaper surprisingly well! The tiles were a beast to install around the water heater and filter.
Check out this gnarly hole in the wall! I cut four pieces of foamboard to fit around the exposed copper pipes, then spent seven days iteratively joint compounding and sanding to get the wall smooth. Plumbers’ cloth for cleaning these pipes is a genius product.
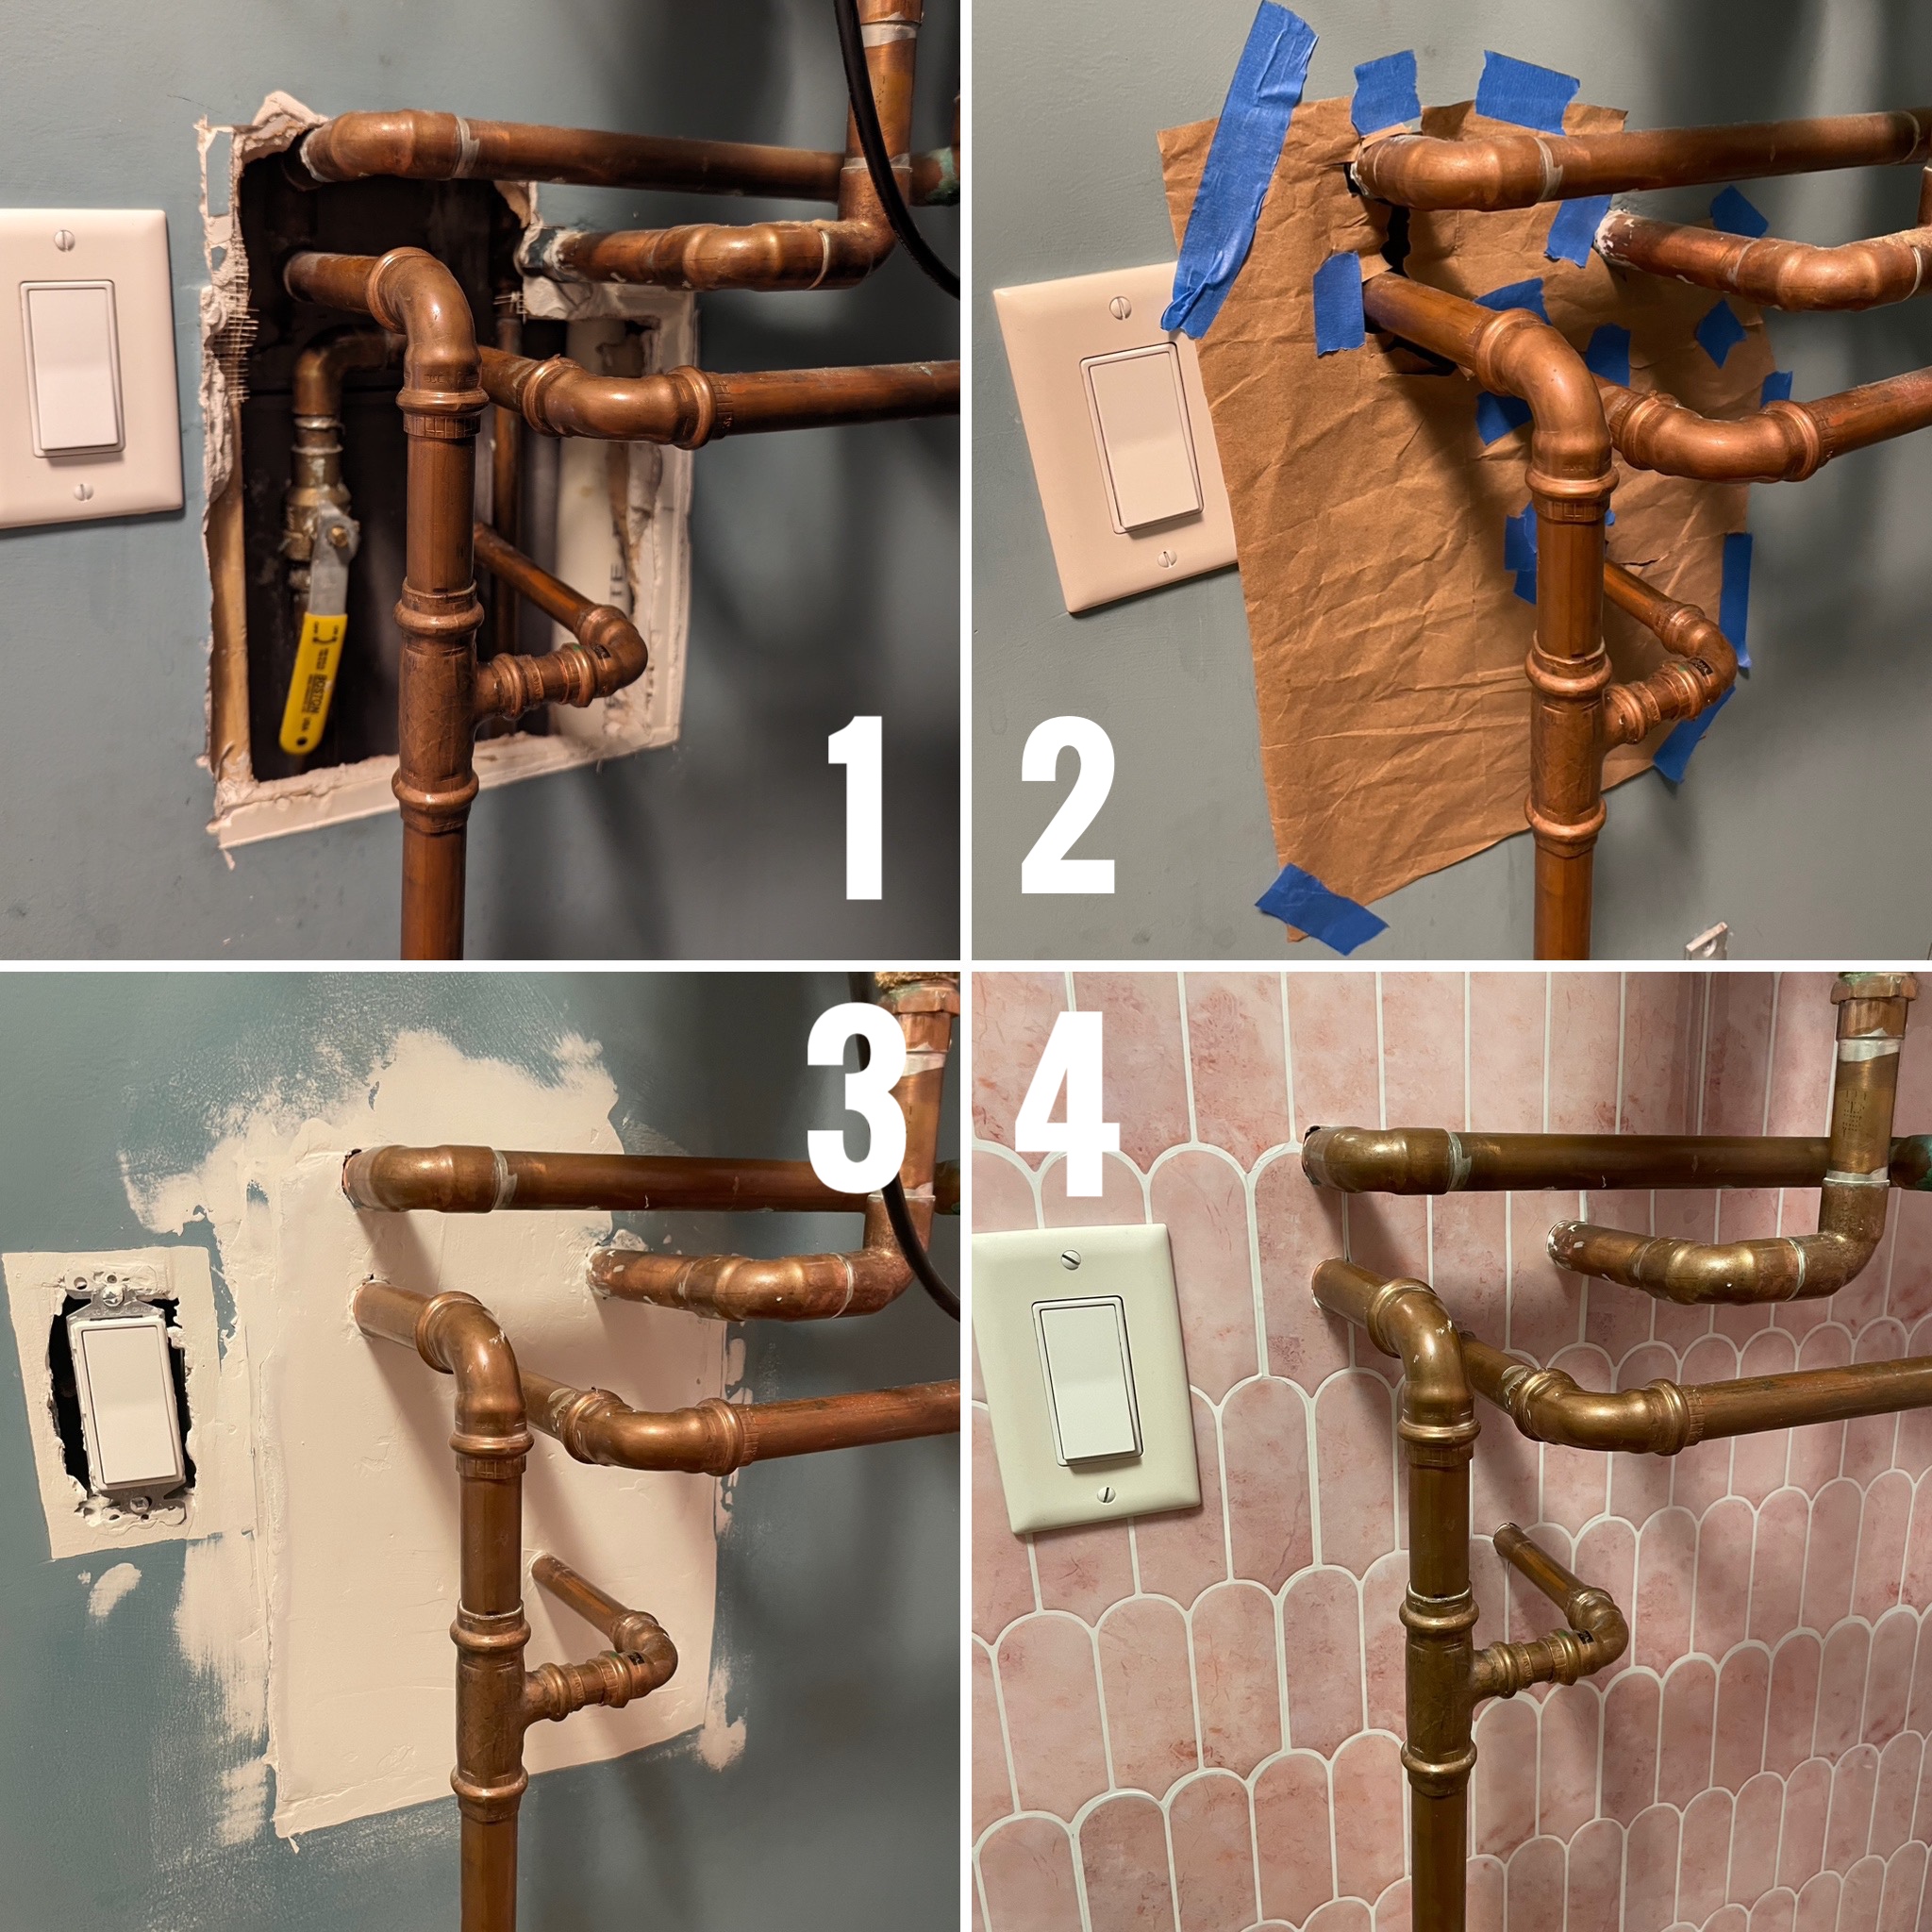
Why the hole? We put a
filter on our water main
four years ago… and this drywall has been open since then. ![]() Feels great to have finally checked this patch job off my to-do list!
Feels great to have finally checked this patch job off my to-do list! ![]()
Step 2: Installing cabinetry.
I opted for two Ikea 18” Sektion units (and faux butcherblock countertop)
to get the number of heavy duty drawers and laundry bin space I needed.
Assembly and installation (including constructing a custom base from 2x4”s) was straightforward,
but making it all look built-in required skills and tools that I did not (yet) have. ![]()
![]()
![]()
![]()

Intricate cuts. For instance! Check out this awesome cut I made with my new contour gauge and new tabletop jigsaw to get edging to fit against the baseboard. I also used the baseboard from behind the cabinets (that I cut out with my new multitool) to craft a toekick for the front of the cabinets.
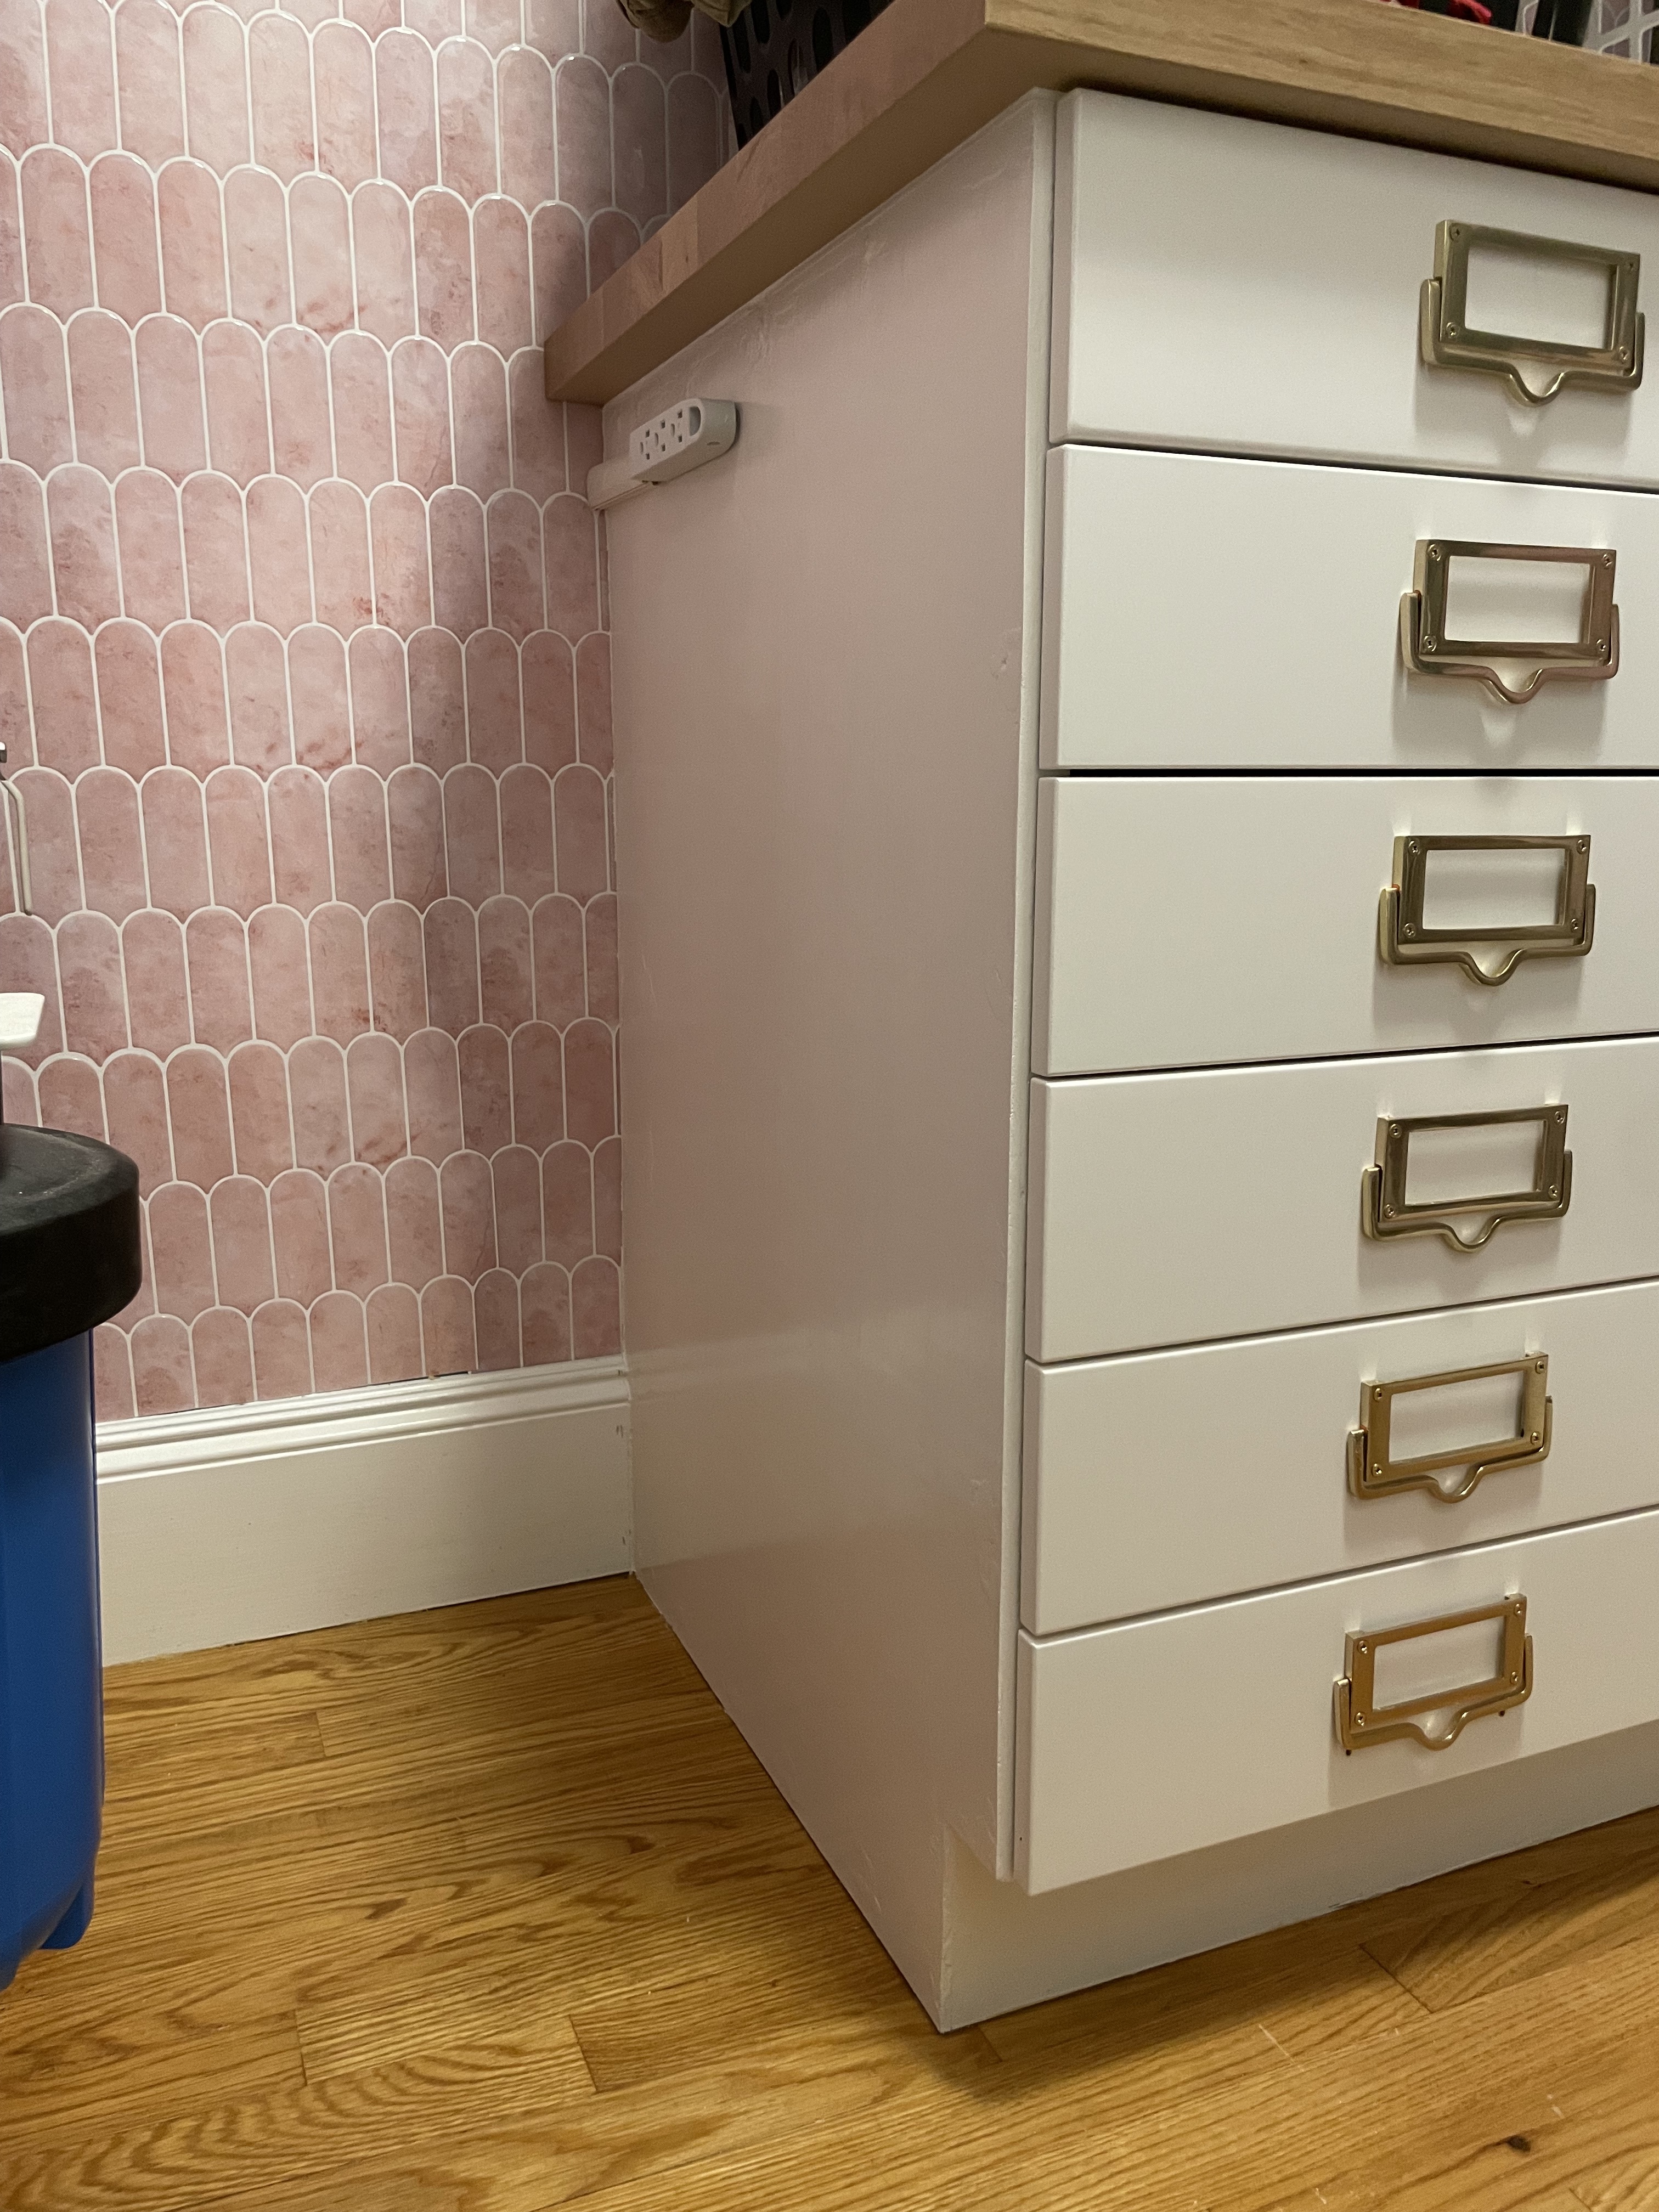
I cut this side panel from 1/4” underlayment, secured it to the cabinets with construction adhesive and wood screws, then applied wood putty and sanded (with my new orbital sander!) the screw holes before priming and painting. I plugged in this power strip extension before installing the cabinets, then taped it onto and screwed it into the side panel and covered the cord.
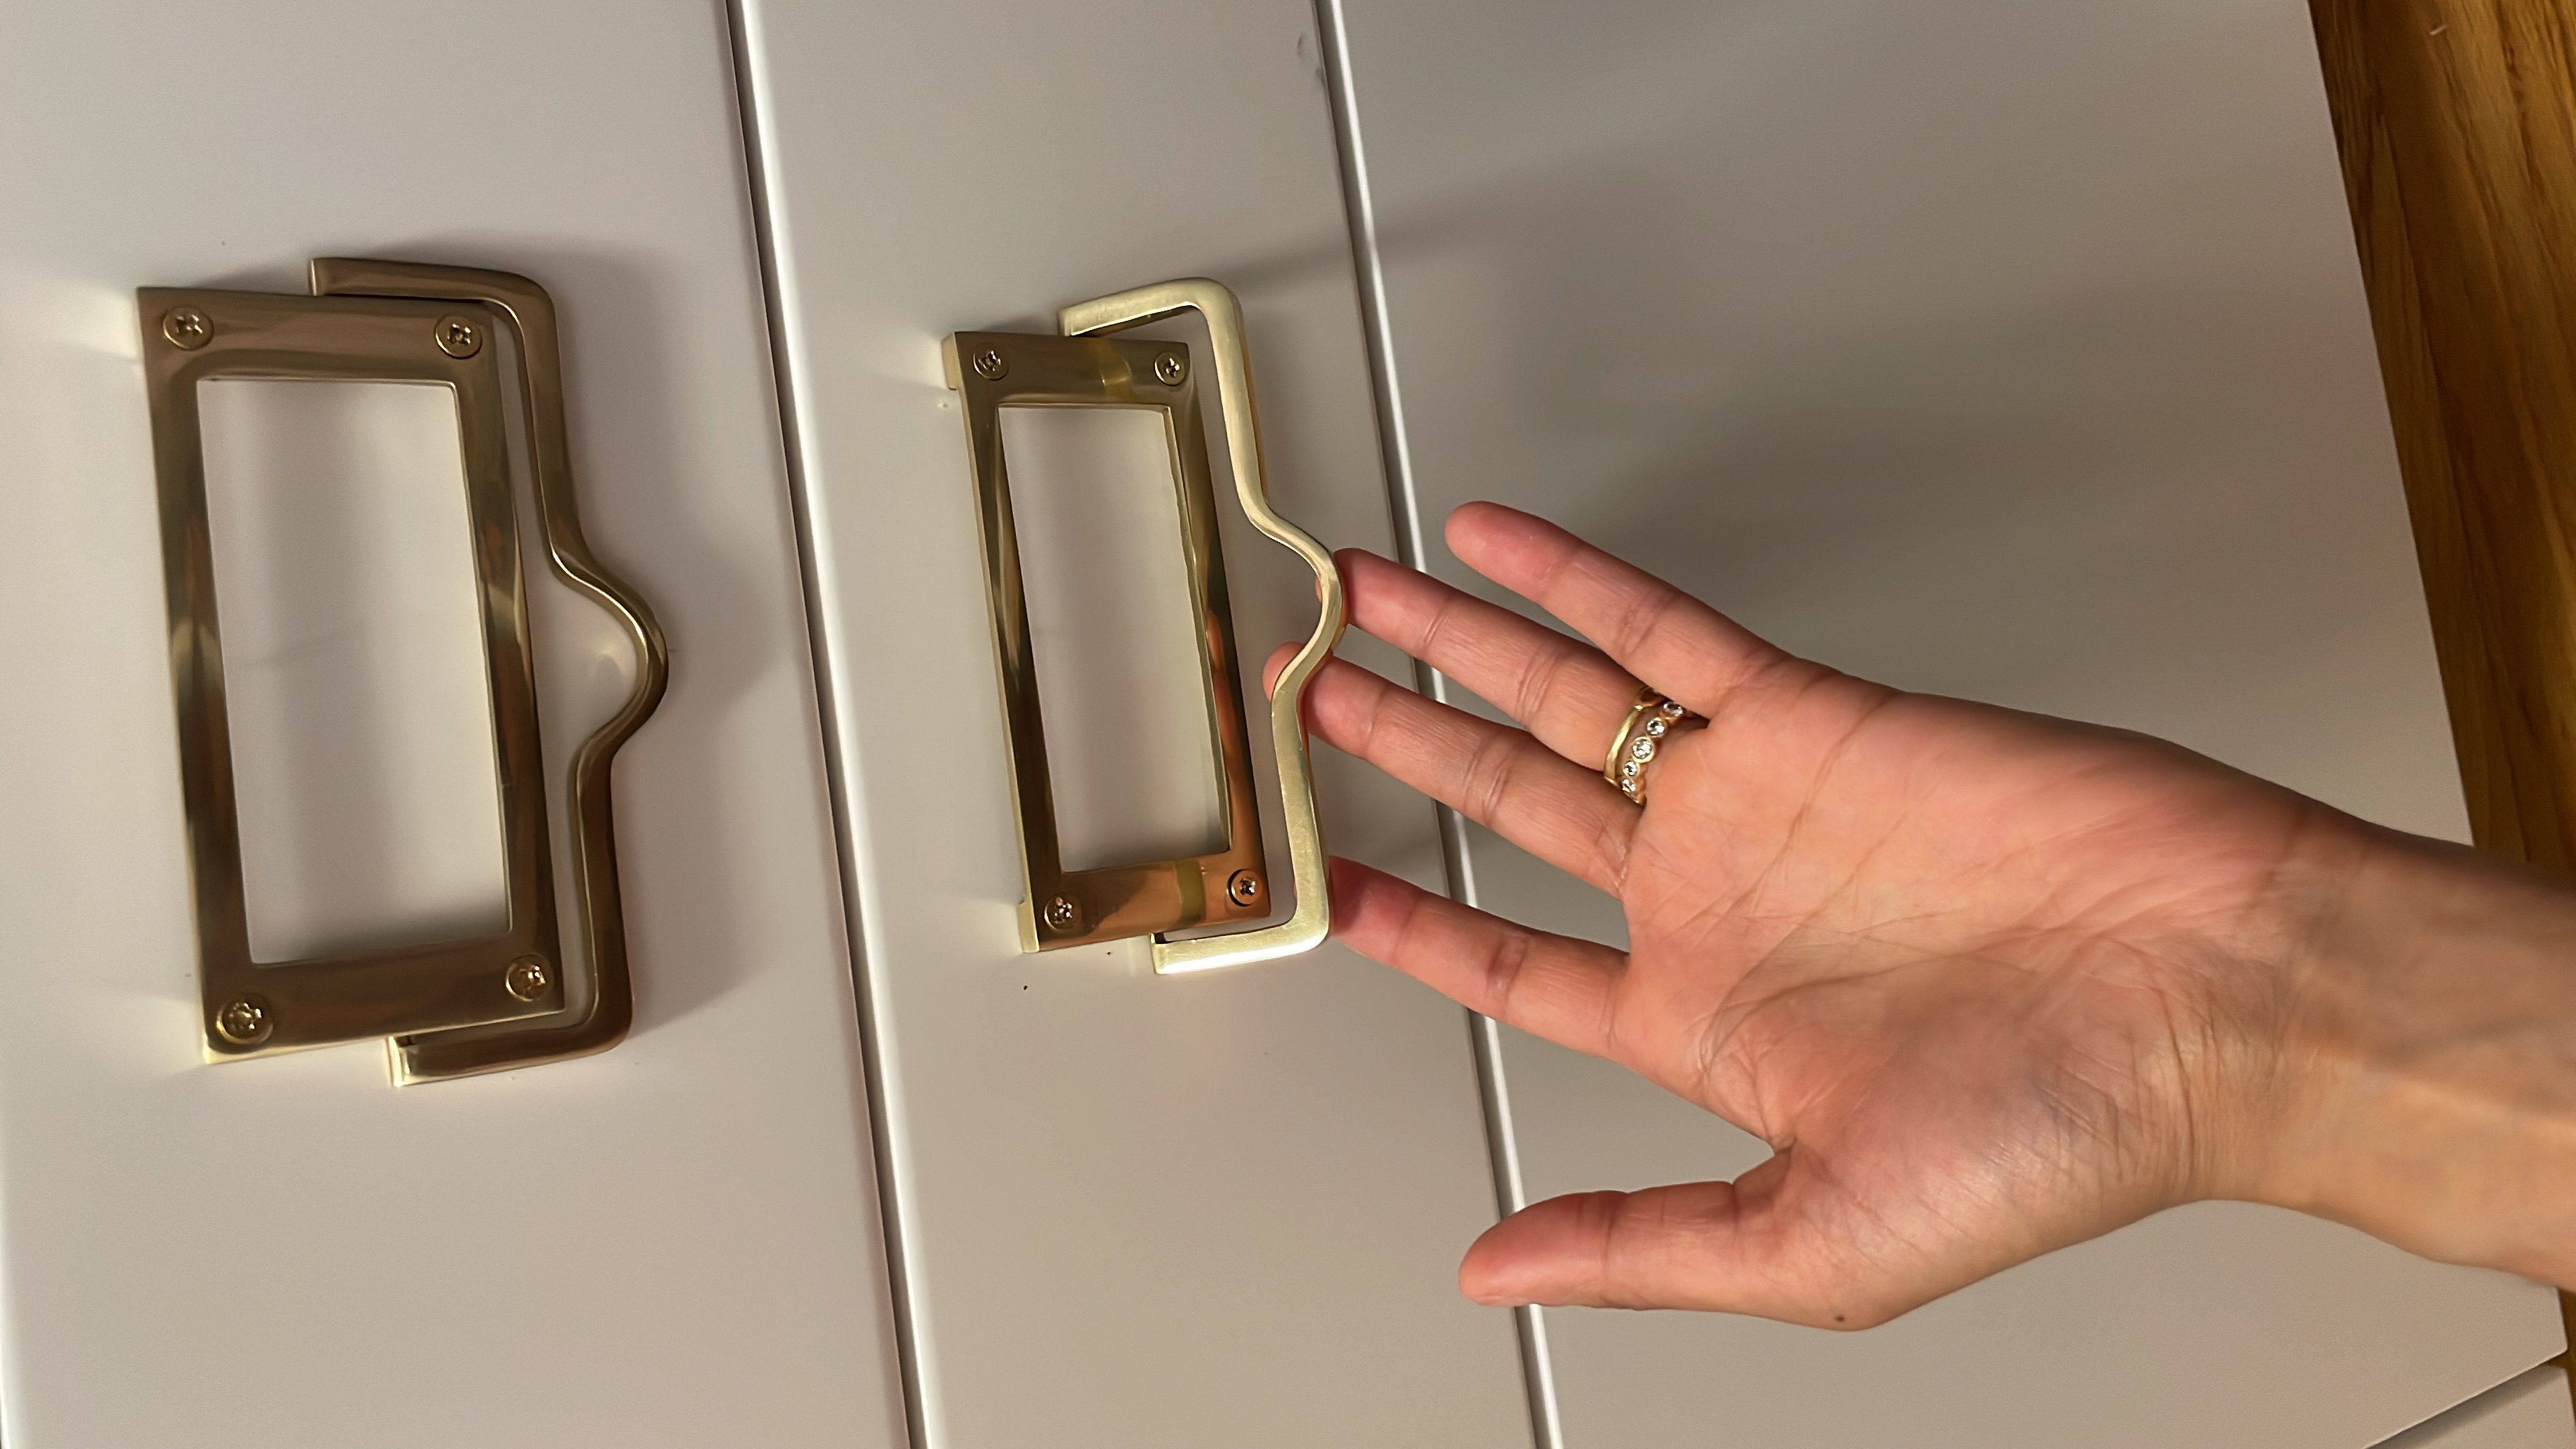
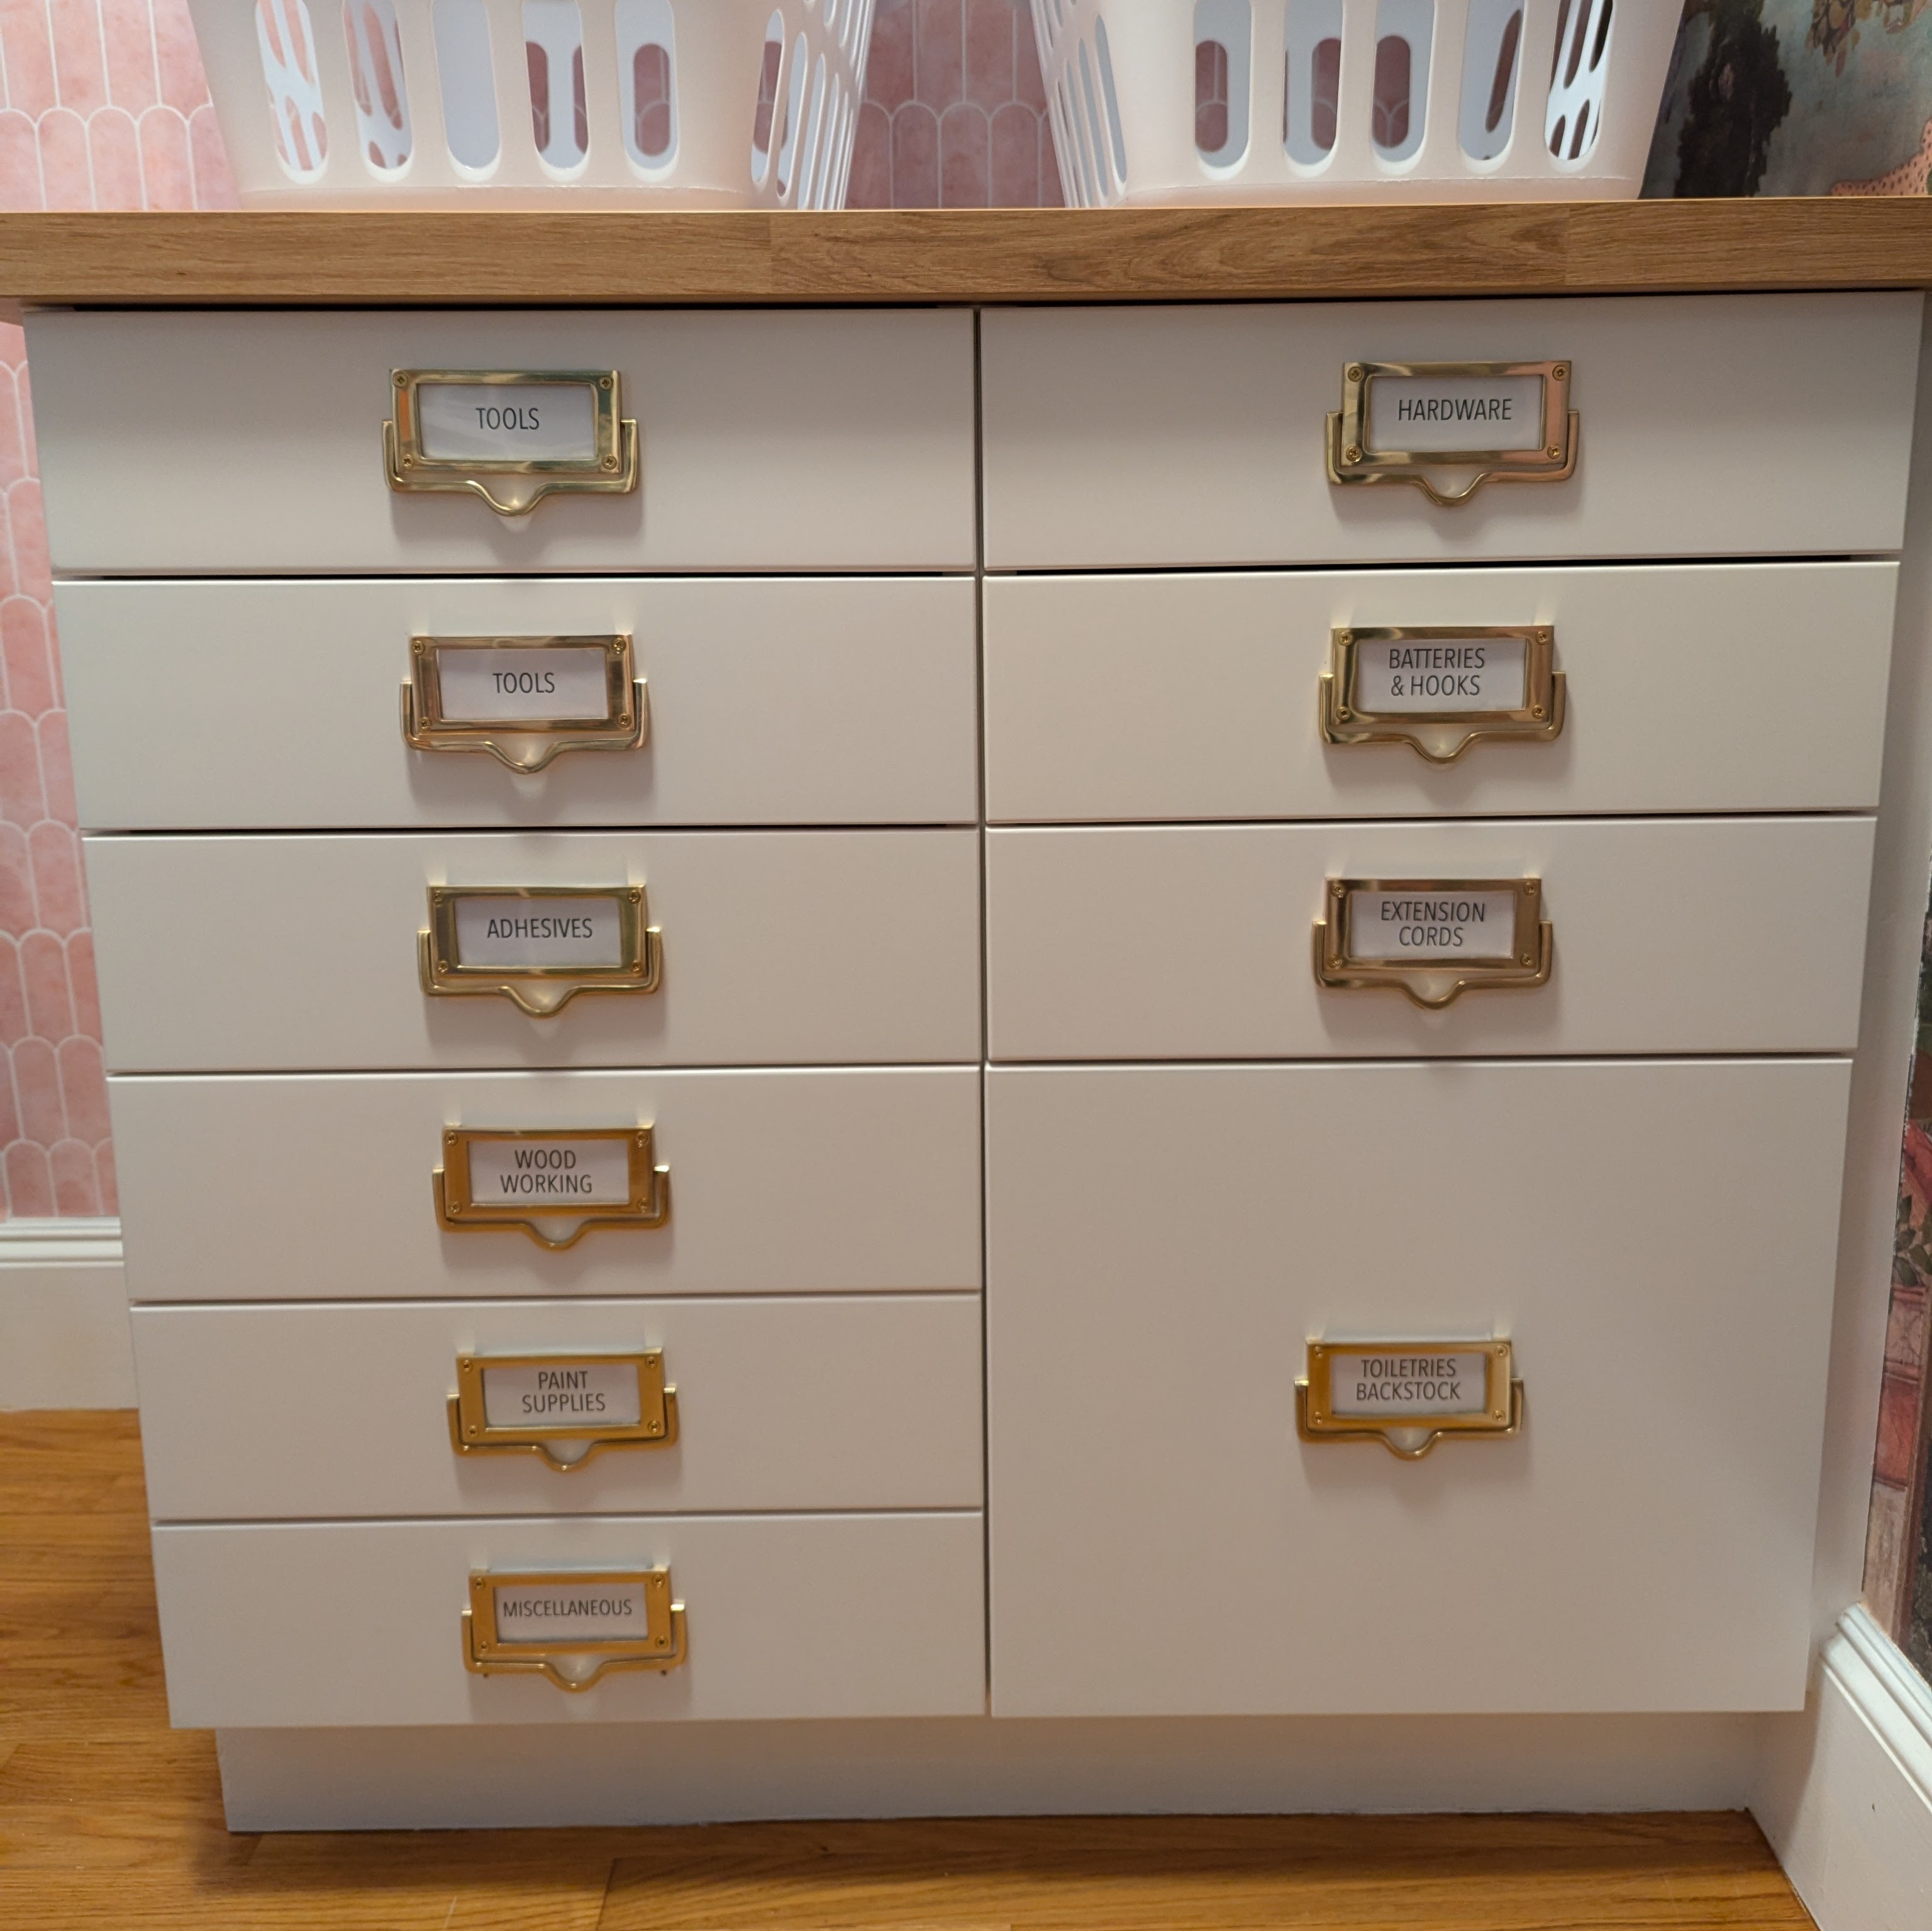
Label holder drawer pulls. Some of my favorite items in this space are these brass label drawer pulls, despite the modifications they required:
- They clattered like door knockers
 , so I found some 1/8” screw thread protectors
at the hardware store to put around the pull connections to soften/slow the pull.
, so I found some 1/8” screw thread protectors
at the hardware store to put around the pull connections to soften/slow the pull. - All four screws per handle needed to be shortened with a bolt cutter so that they wouldn’t puncture through the drawer front.
- I cut my own transparencies, labels, and cardboard padding to size for the labels.
All worth it, since there was no other product that so perfectly fit what I was looking for! ![]()
Step 3: Installing shelves.
I chose the Ikea Boaxel system (which I also used in my entryway pantry) because it doesn’t limit bin depth the way closed cabinets might, and because it’s easy to pop the shelves off to make space for servicing or replacing the water heater. I primed and painted the wall rails to match the backsplash and scrubbed the brackets with acetone to remove the printed product info.
Here are the finished shelves, which happened to fit three of these 16 qt. Sterilite bins across perfectly. I labeled the baskets by attaching label frames with brass fasteners.
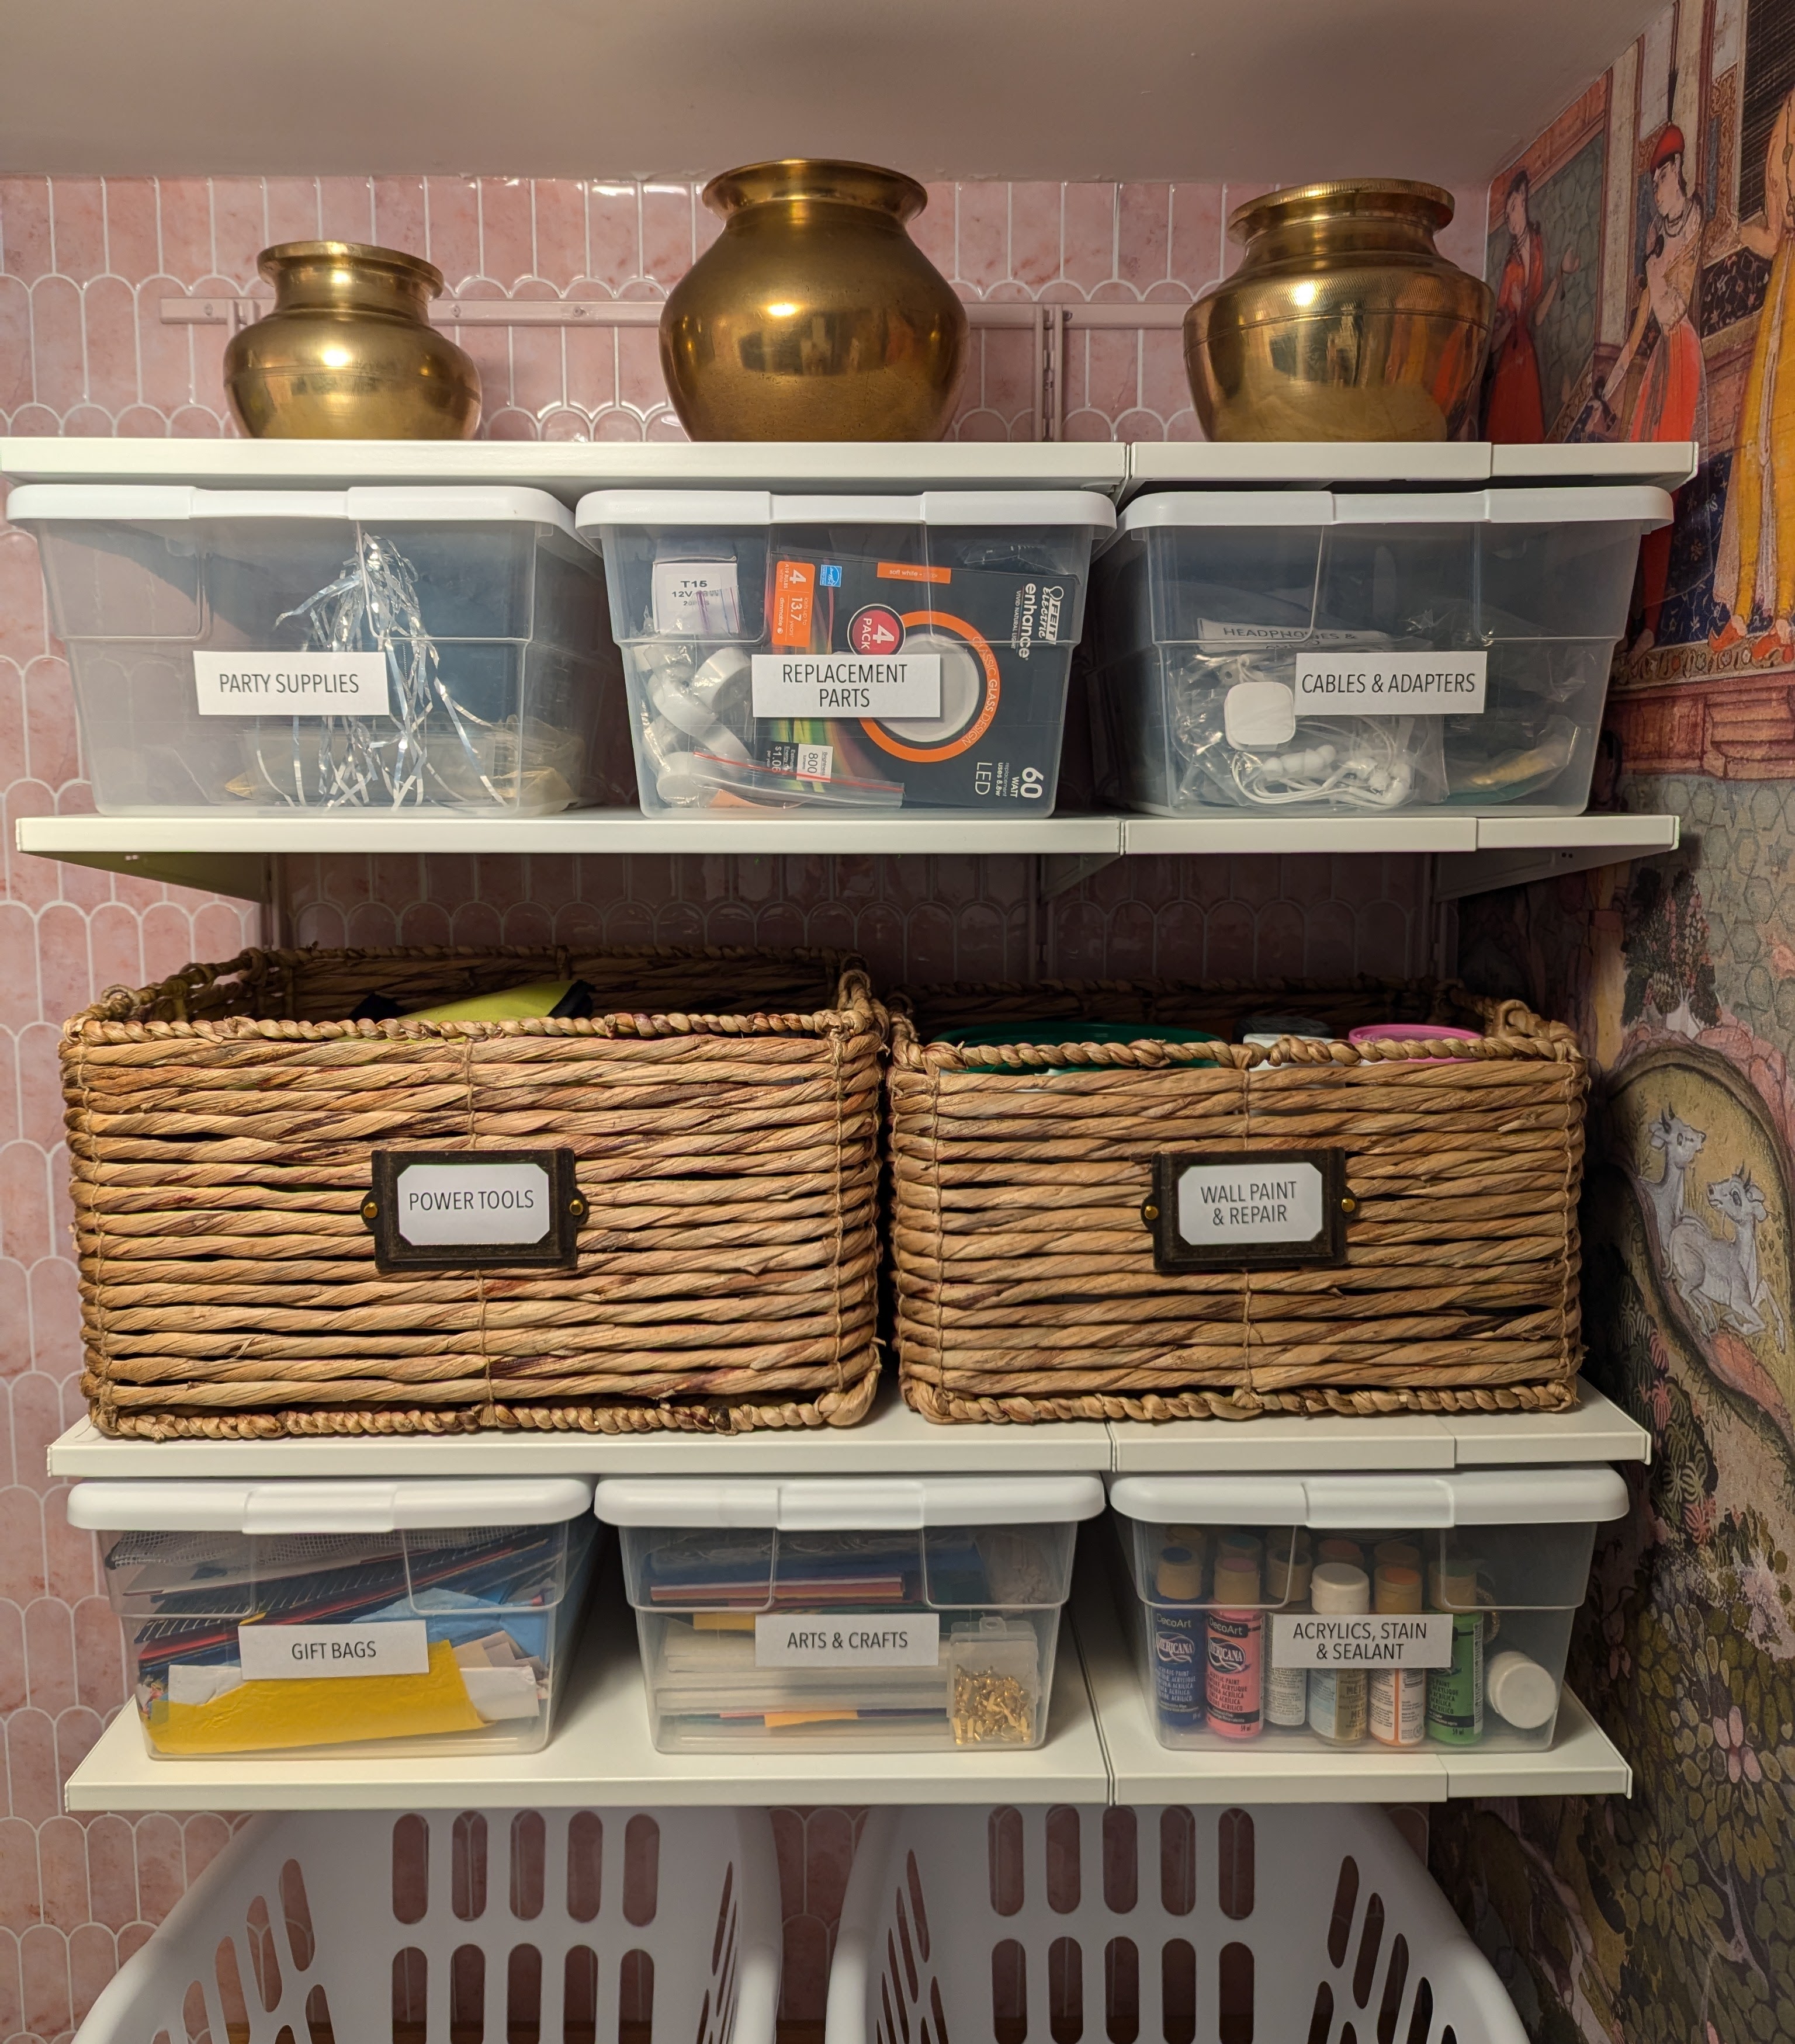 The brass pots on the top shelf belonged to my maternal grandmother (left), maternal grandfather’s mother (middle) and maternal grandmother’s mother (right)
and were used to collect water from the village well !
The brass pots on the top shelf belonged to my maternal grandmother (left), maternal grandfather’s mother (middle) and maternal grandmother’s mother (right)
and were used to collect water from the village well ! ![]()
Step 4: Organization!
I’ve saved many spare/replacement/mystery parts for furniture and appliances over the years just in case.
But then I forgot about all of these things, which is effectively the same as
not having it… ![]() ! My first step was being realistic and clearing out all the mystery odds and ends.
! My first step was being realistic and clearing out all the mystery odds and ends.
They say it gets worse before it gets better, and yep…
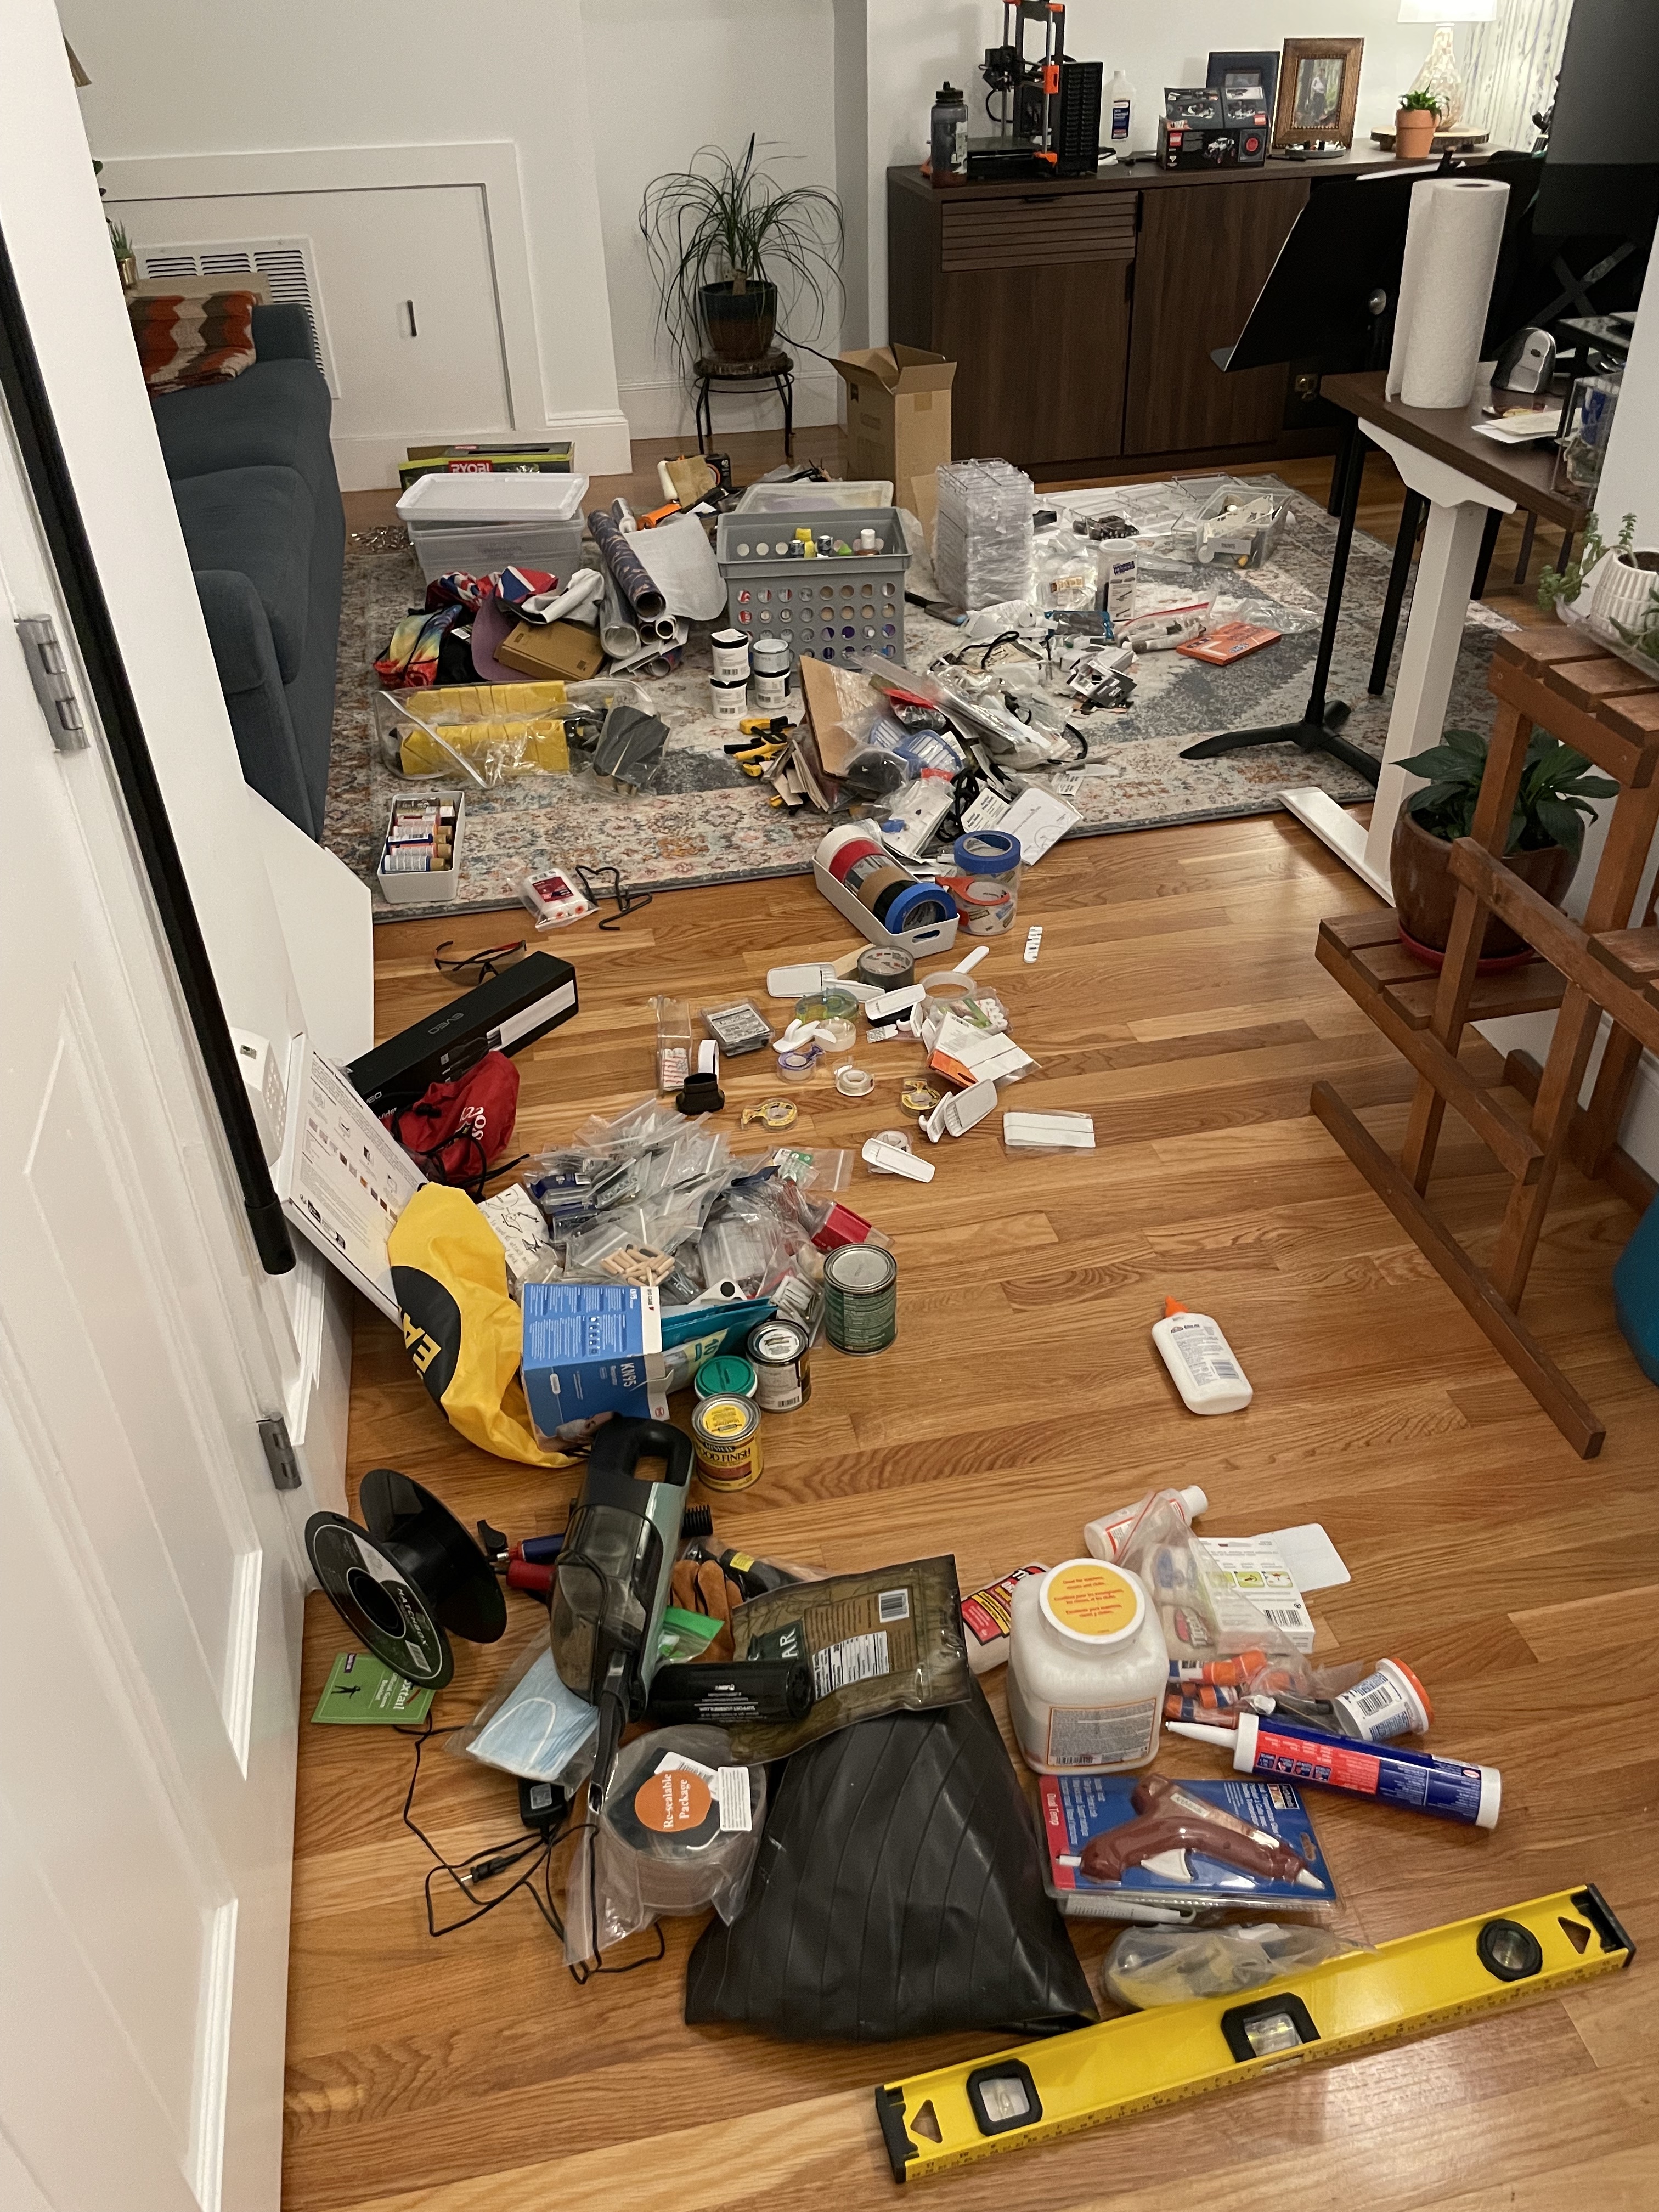
I laid everything out to edit and organize. Here are some things that made the cut, including an updated minimum stash of home tools:

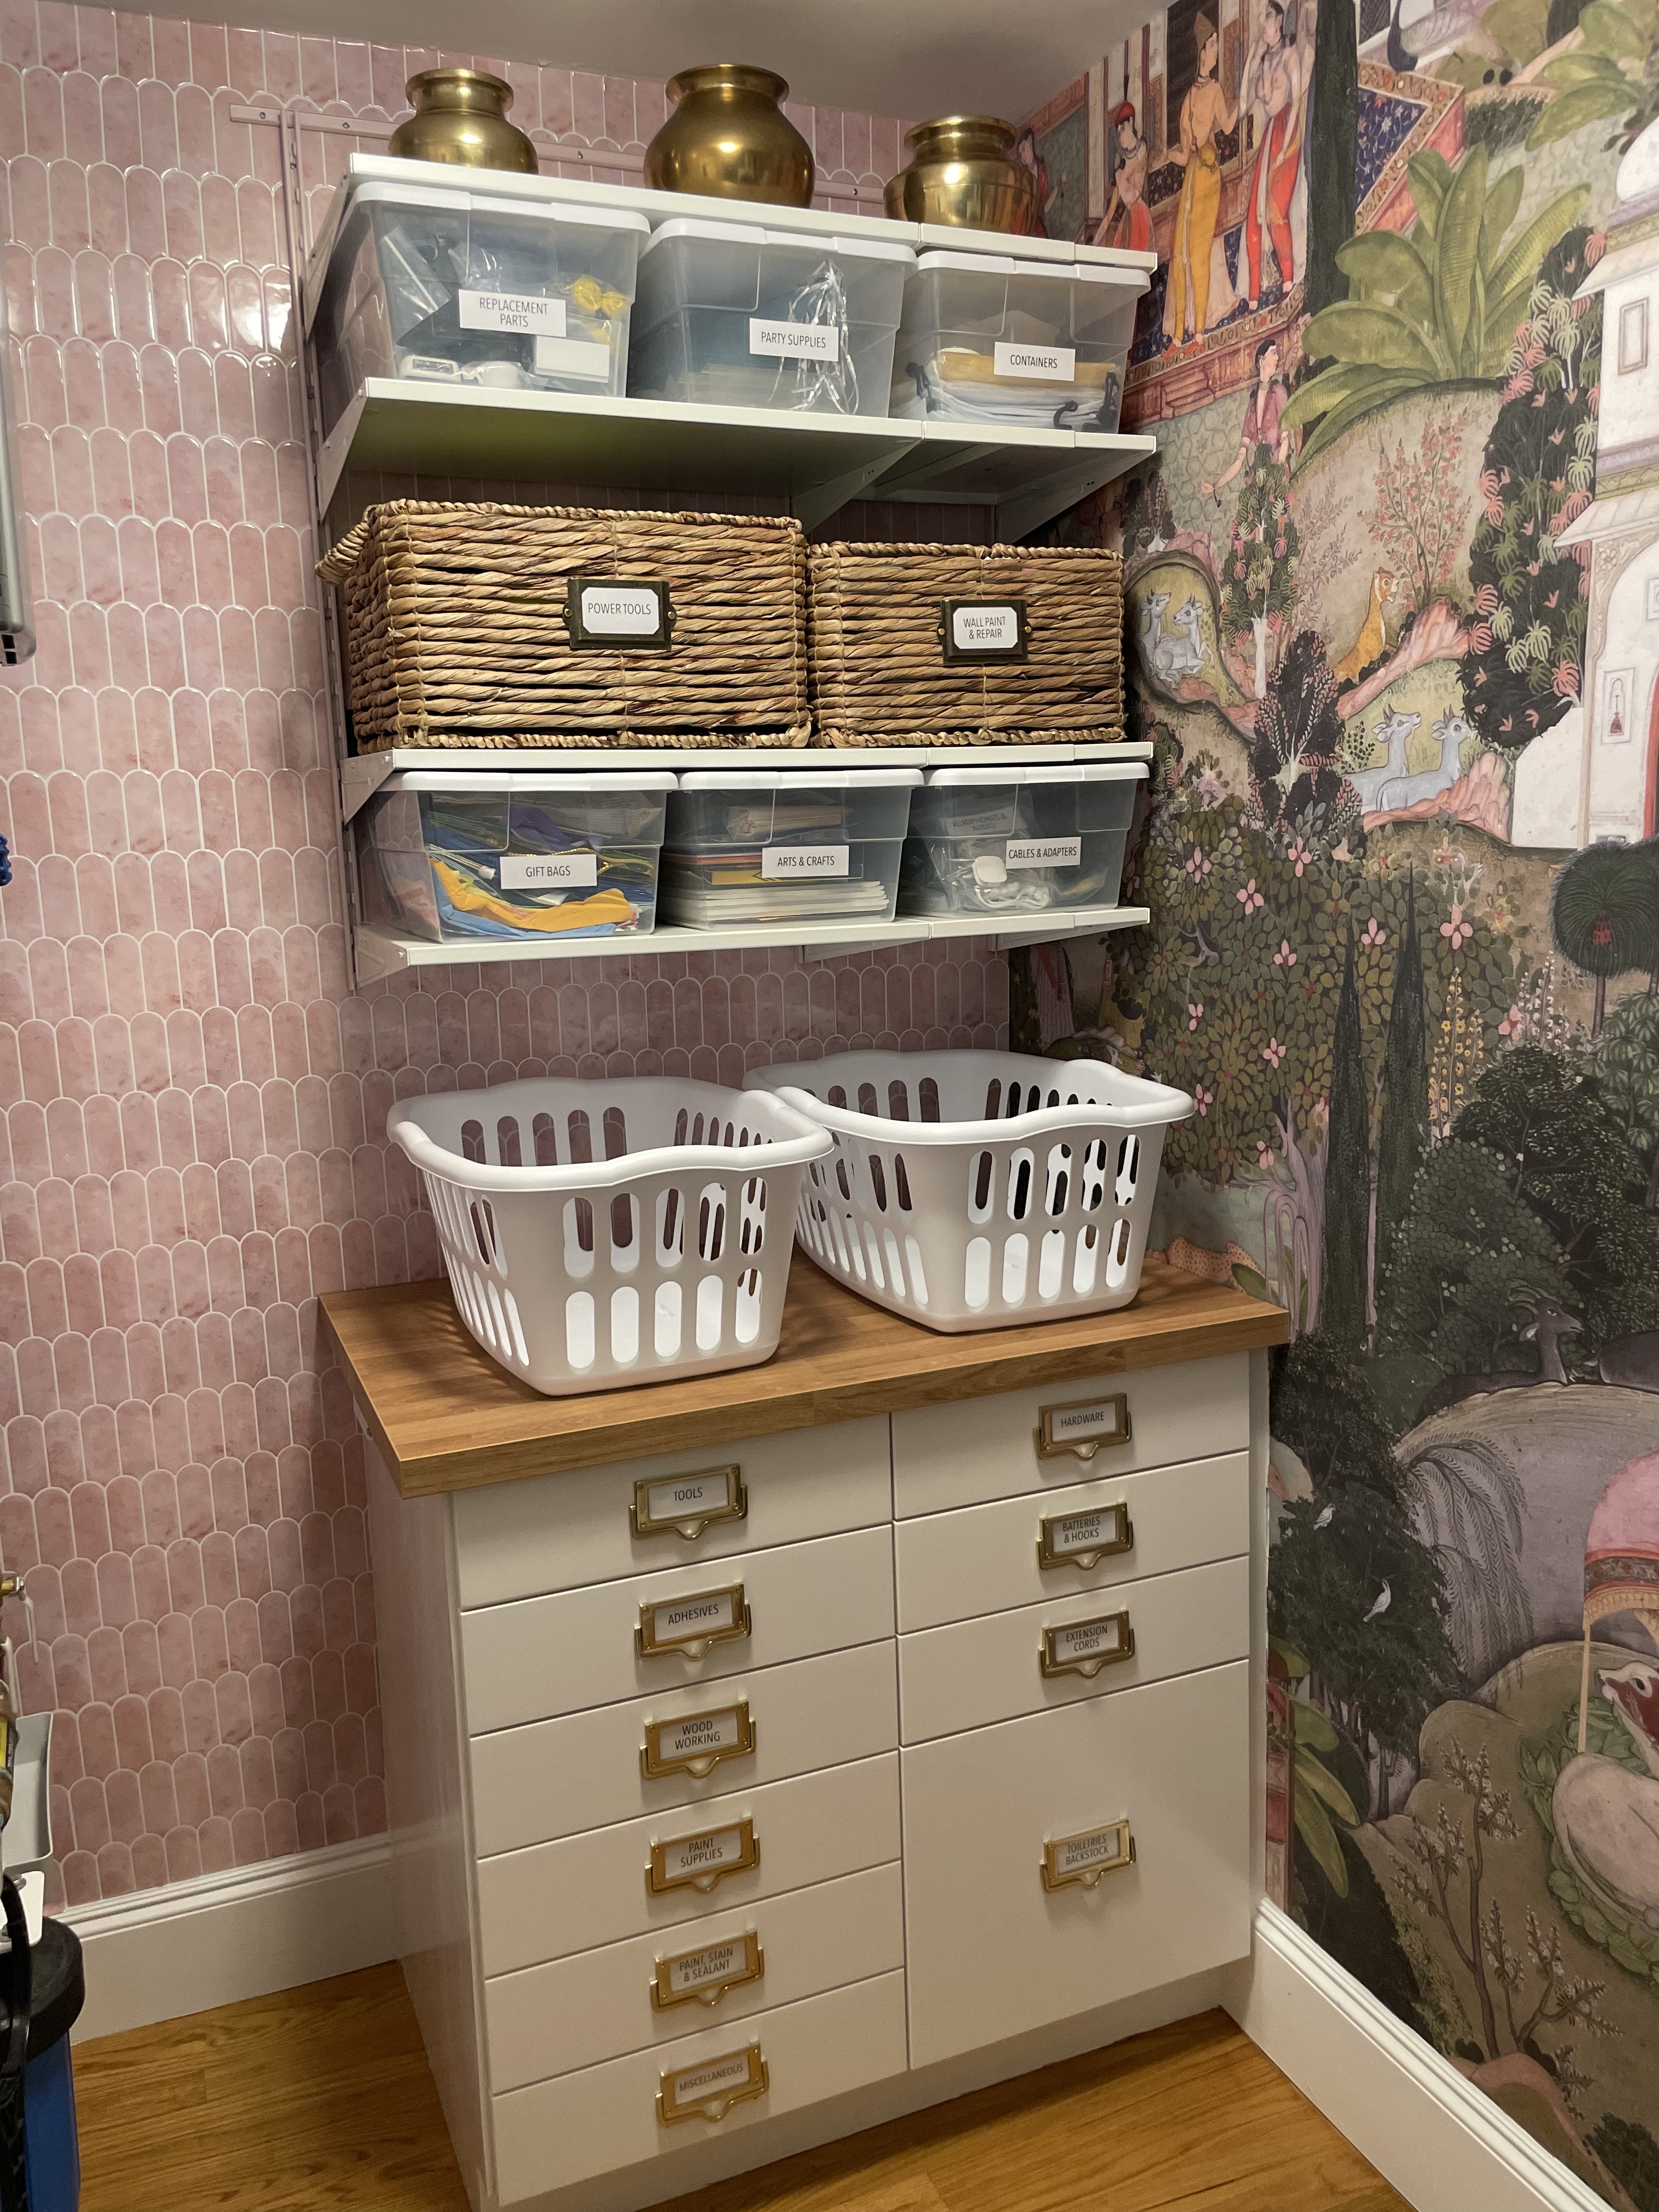
I’ll leave you with one last “after” view of the utility corner!
Cost breakdown
| Materials | Cost (+ tax/shipping) |
|---|---|
| Ikea Sektion base cabinets, drawers, legs, wall rail, countertop; Boaxel suspension rail, 3 wall rails, 12 brackets, 4 long shelves, 4 short shelves | 884.82 |
| Art3D peel-and-stick wall tile (9 boxes) | 315.47 |
| Gardens of Jaipur peel-and-stick wall mural | 232.82 |
| 10 brass label drawer pulls | 201.88 |
| multitool | 95.71 |
| Benjamin Moore Fresh Start primer, 2 quarts of color-matched semi-gloss paint, foam roller | 93.60 |
| tabletop jigsaw | 56.56 |
| acrylic drawer organizer set | 40.36 |
| shelf baskets and plastic mini bins from TJ Maxx | 40.34 |
| 4’x4’ underlayment, 2x4” fir stud, construction adhesive | 34.39 |
| bamboo drawer dividers | 33.99 |
| flat plug extension cord | 18.16 |
| label holders and brass fasteners | 18.04 |
| contour gauge | 12.74 |
| 2 white laundry baskets | 12.73 |
| cable tie straps | 9.38 |
| wood filler | 5.30 |
| 20 1/8” screw thread protectors | 3.19 |
| orbital sander (gifted!) | 0 |
| circular saw (borrowed) | 0 |
| SOLD wire 5-tier shelf | +50 |
| SOLD ironing board and steamer | +10 |
| TOTAL | $2049.48 |
The second (and final) part of this project is also complete: the laundry half of the laundry room !

Shilpa Kobren is the Associate Director of Rare Disease Analysis at Harvard Medical School where she focuses on analyzing genomic sequencing data with patient clinical information to derive insights into human diseases. Shilpa lives in an 1890s urban apartment in Cambridge, Massachusetts with her husband and two energetic toddlers. She retains her sense of peace amid the chaos by creating and iteratively improving systems that optimize daily efficiency in her family's constrained living space.